Mom’s Crazy Chili

Nothing sounds better on a freezing cold night than a big bowl of chili. It’s warm, hearty, delicious comfort food – but it can be healthy comfort food! The best thing about chili is that you can pretty much add whatever ingredients you want as long as you have the basics: meat, beans, beer, and the right spices (that’s right: beer).

I may be biased, but I believe my mom makes the best chili. When I called her to ask her for the recipe (for about the 15th time), she replied, “Well, I just add a little of this and a little of that.” I asked, “Well do you know how much chili powder or cumin you add?” She answered, “I add enough to make it taste good.” So I improvised. That’s why I call it my mom’s crazy chili recipe – there really isn’t any set recipe. But those basics I mentioned are in there, and that’s the key. I also truly believe that beer is the secret ingredient to setting this one over the top.

I’m going to break down necessary ingredients and optional ingredients. I’ll also give you healthy and indulgent options. Lastly, you can make this either on the stove or in the crock pot, so I’ll give you both options there, too. However, there is one area where you don’t have an option: you cannot make just a little bit of chili. You have to make a giant pot. But that’s a good problem to have because chili makes the best leftovers!

This one was hard to tag because you can make it as healthy as you want! As long as you have the basics, it's delicious.

This one was hard to tag because you can make it as healthy as you want! As long as you have the basics, it’s delicious.

What you’ll need:

Necessary ingredients:

  • 2 tablespoons olive oil
  • 1-1.25 pounds ground meat – use ground turkey for a healthier option, but I love the taste of ground beef.
  • 1 large onion, chopped
  • 4 teaspoons minced garlic – not necessary to have fresh garlic, but garlic in general is necessary. Use more garlic powder if you don’t use fresh garlic.
  • 1 tablespoon garlic powder – garlic powder is necessary, even if you use fresh garlic. If you don’t use fresh garlic, too, then triple the garlic powder.
  • 4 tablespoons cumin
  • 4 tablespoons chili powder
  • 3 bay leaves
  • 28 ounce can crushed tomatoes
  • 1 can or bottle of dark beer – ales, nut browns, stouts, or porters are the best. In a pinch, you can use a light beer, but stay away from IPAs.
  • 2 cans red kidney beans, rinsed

Optional ingredients:

  • Bell peppers, chopped – I like green because it adds color; I use 2 bell peppers
  • Cayenne pepper – adjust the amount to make it more or less spicy; I use 1/2 teaspoon
  • Celery, chopped – it adds a nice crunch to the chili, just use however much you have in the fridge
  • Carrots, chopped – it adds a little sweetness to the chili, again, use however much you have in the fridge
  • Bacon, crumbled – either turkey bacon or regular bacon is delicious, turkey bacon is healthier
  • Rice – it’s traditional in my family to serve chili over rice
  • Cheddar cheese – I love topping my chili with cheese!

What you’ll need to do:

Brown your meat in the two tablespoons olive oil over medium-high heat on the stove for about 5-7 minutes. If you’re going to use a crock pot, use a large pan. If you’re going to make the chili in a pot on the stove, just brown the meat in the pot. As the meat is browning, constantly break it apart with a wooden spoon. You want the meat to be smaller crumbles instead of large chunks.

Or, as an alternative, cook the bacon in the pan first. Cut or tear the bacon into smaller pieces and put them in the pan so that they cook faster and so you don’t have to crumble it later. If you’re cooking turkey bacon, cook the turkey bacon in the olive oil. If you’re cooking regular bacon, don’t put any oil in the pan. Then brown your meat in the same pan with the bacon drippings.

When the meat has browned, turn the heat down to medium and add the onion. If you’re using fresh garlic or bell peppers, add those at this time, too. Cook for about 3 minutes or until the onion has turned translucent. Add all your dry spices, except the bay leaves, and stir with the spoon until the spices thoroughly coat the meat and veggies.

I used turkey chili here, but the spices added the darker color.

I used turkey chili here, but the spices added the darker color.

If you’re cooking in a crock pot, transfer the meat and veggies into the crock pot. Add the can of crushed tomatoes, beer, and bay leaves, either in the crock pot or big pot on the stove. Stir to mix.

Cover and let cook for many hours. If you’re using the crock pot, set on low heat for at least 6 hours – you can let this cook all day if you’re making it on a work day. If you’re cooking on the stove, turn the heat to low and let simmer for at least 4 hours, stirring occasionally. The chili generally tastes better the longer you let it cook.

This will make your house smell wonderful all day!

This will make your house smell wonderful all day!

In the last hour of cooking, add your kidney beans. You can also add celery or carrots at this time if you’re using them. Stir and cover.

I love serving my chili over rice and topping it with cheddar cheese. In my family, we’ve also been known to put chili over tamales, but that may be a Southern California thing. Of course, chili is also delicious on hot dogs, fries, or other ballpark food. I’ve also heard of people putting chili over noodles. If you want to make it healthier, chili would also be good over quinoa. But you don’t have to pair it with anything at all – this chili is also delicious all by itself.

Enjoy!

Thanksgiving: The Turkey

When I first offered to host Thanksgiving, nothing intimidated me more than cooking the turkey. Potatoes and stuffing are easy and very forgiving with flavors and cooking time. And besides, turkey is the main event. But I’ve tasted way too many dry, overcooked turkeys in my life to think I could cook one easily.  How do I defrost the damn thing? How long do I cook it? What kind of seasonings do I use? Is it the stuffing that adds the flavor? (Remember, I don’t like stuffing in the turkey). How do I get the crispy outside and juicy inside? I was lost. I read recipe after recipe trying to figure out the trick to keeping it moist and tasty. And, I admit, I called the Butterball Hotline. My fears weren’t assuaged, but I figured there was nothing left for me to do but jump in and give it a shot.

I narrowed down my recipe collection to one basic, easy-looking recipe. I figured it was a good start and I could always add more or edit later if I needed to. By some stroke of luck, it was delicious. The turkey was crispy on the outside and juicy on the inside. And I have used the same turkey recipe without any changes or additions every year since.

The trick, I learned, is brining. Soaking the turkey overnight in a sugar-salt mixture makes the turkey super juicy, and I don’t really add much seasoning past that!

It turns out that cooking a delicious, juicy turkey is really easy. It takes a long time, but not a lot of attention. So if you’ve ever been too afraid to cook a turkey, fear no more. Give it a try and I promise you’ll find it’s a lot easier than you think.

Golden-brown, juicy, and delicious. There's never a reason to be scared of cooking a turkey again!

Golden-brown, juicy, and delicious. There’s never a reason to be scared of cooking a turkey again!

What you’ll need:
2 gallons water
2 cups salt
1 cup brown sugar
1 12-13 pound turkey
8 tablespoons butter
4 tablespoons garlic salt
4 tablespoons Italian seasoning
2 small onions
4 stalks celery

**Tip: You can scale the ingredients up or down based on the size of your turkey.

What you’ll need to do:

The night before Thanksgiving, start by cleaning and brining the turkey. Remove everything from the cavity (giblets, neck, and plastic bag) and discard. Place the turkey in the sink and thoroughly rinse the inside cavity and skin with cool water. This helps remove any bacteria within the cavity or on the skin.

In a very large pot, heat about 2 quarts of water, salt, and sugar over high heat. Stir until the salt and sugar dissolve. Add the remaining gallon and a half of water to help it cool faster. Cool to room temperature then submerge the turkey in the brine. This takes about an hour to prepare the brine, so don’t do it too late! Refrigerate overnight.

Be careful, that thing is heavy!

Be careful, that thing is heavy!

Remove the turkey from the brine. Pat the turkey dry and place in a roasting pan. Brush the turkey all over with melted butter, and season with garlic salt and Italian seasoning. Cut your two small onions in half and remove the skins. Cut the celery stalks into 4 pieces each. Stuff the turkey cavity with the onion halves and celery stalks for added taste and juiciness.

This guy is ready to go in the oven!

This guy is ready to go in the oven.

Put the turkey in the oven at 325 degrees. Here’s a timetable for roasting the turkey from the USDA:

  • 8 to 12 lbs: 2 3/4 to 3 hrs
  • 12 to 14 lbs: 3 to 3 3/4 hrs
  • 14 to 18 lbs: 3 3/4 to 4 1/4 hrs
  • 18 to 20 lbs: 4 1/4 to 4 1/2 hrs
  • 20 to 24 lbs: 4 1/2 to 5 hrs

Every hour or so, brush the turkey with more melted butter. This makes the skin nice and crispy. Cook to an internal temperature of 165 degrees.

**Tip: I can’t stress the importance of having a good meat thermometer. They’re not expensive, but they really help when cooking meat in the oven. They save you from having to cut open the meat to check doneness and letting the juices all run out!

After the turkey is done cooking, transfer to a cutting board and tent loosely with aluminum foil. Let it rest for about 30 minutes before carving.

Enjoy!

Turkeys don’t have to be cooked only for Thanksgiving. Try cooking one in the off-season. I already have a couple small turkeys in my freezer waiting for a good winter weekend.

Thanksgiving: The Gravy

If you read my Sourdough Bread Stuffing recipe, you know I’m not the biggest fan of cooking inside the bird. Sorry if I offend anyone, but it grosses me out. The same goes for gravy. I like other, non-inside-the-bird ingredients in my gravy, too. More than anything, I think it tastes better.

Plus, then you can make either the stuffing or the gravy even if you’re not making turkey. It is packed full of flavor from garlic, rosemary, thyme, and shallots without tasting like the inside of bird. This gravy would be delicious over chicken or potatoes, on a sandwich, or even over beef. Added bonus: it only takes about 10 minutes to make, so it’s easy to pop on the stove while you’re cooking everything else.

What you’ll need:

2 tablespoons olive oil
1 shallot, minced
4 teaspoons garlic, minced
1 sprig rosemary, minced (about 1 tablespoon)
1 sprig thyme leaves, minced (about 1 tablespoon)
1 bay leaf
1 teaspoon salt
3 tablespoons butter or margarine, melted
3 tablespoons flour
4 cups low-sodium chicken broth

**Tip: Fresh herbs are better, but you can raid your spice cabinet if you don’t want to make the trip to the market. If you use dried herbs, double the amounts.

What you’ll need to do:

Place a medium saucepan over medium-high heat and add your olive oil. Add the minced shallot, garlic, rosemary, thyme, and bay leaf. Cook until the shallot is tender, or about 3 minutes.

The smell of this is incredible. I can't imagine making gravy any other way!

The smell of this is incredible. I can’t imagine making gravy any other way!

While the shallot mixture cooks, make a paste with the butter and flour in a small bowl.

**Tip: The flour is going to be what thickens the gravy, and it’s really important to make this paste separately – do not add the flour straight into your gravy or you’ll get little lumps. Whenever you’re making a roux, always make a paste with the flour before your add it into your gravy or sauce.

Add the broth to the shallot mixture and scrape up any browned bits from the bottom of the pan with a wooden spoon. Bring to a boil, then whisk in the butter/flour mixture. Boil until sauce thickens to make a gravy, or about 5 minutes. Remove and discard the bay leaf.

Enjoy!

Let’s Talk Steak

Steak is a treat food for me. I don’t eat it all that often because it’s a little pricier than my go-to chicken and it’s not as healthy to eat all the time. But if you do it right, steak can be budget-friendly and good for you. Plus, I think it’s even easier to cook than chicken. Steak is a lot more forgiving because you can cook it to your liking, whereas you can only cook chicken until it’s done (no rare or even medium-rare chicken, please). So before I get into a simple steak recipe, I want to share some basic tips for cooking steak.

Steak is a delicious, easy treat.

Have you ever heard of the hand test to check if the steak is done? No? Well no more cutting the steak open to see if it’s cooked! And no meat thermometers either. Cutting the steak open or poking a hole with a meat thermometer lets the juices run out and makes the meat dry (not to mention it’s not super pretty either). Instead, all you need is the palm of your hand to check if your steak is rare, medium rare, medium, or well done. Simply press on the meat and compare to the pad of your hand as is shown below:

Raw: Open the palm of your hand. Relax the hand. Take the index finger of your other hand and push on the fleshy area between the thumb and the base of the palm. Make sure your hand is relaxed. This is what raw meat feels like.

Rare: Press the tip of your index finger to the tip of your thumb. The fleshy area below the thumb should give quite a bit. This is what meat cooked to rare feels like. Open up your palm again and compare raw to rare.

Medium rare: Gently press the tip of your middle finger to the tip of your thumb. This is medium rare. Press on the steak and see if it feels similar – this is my favorite doneness.

Medium: Press the tip of your ring finger and your thumb together. This is what meat cooked to a medium doneness feels like.

Well Done: Now gently press the tip of your pinky and your thumb together. Again feel the fleshy area below the thumb. It should feel quite firm. This is what well done meat feels like when you press on it.

Got it? It’s pretty simple really, and it’s amazing how accurate that test is. Just remember that the meat continues to cook for a little bit after you take it off the stove or grill.

Next tip: Always let the meat rest so it can reabsorb the juices. Don’t you hate when you cut into a steak and the juices run all over your plate and into your potatoes? Instead, let the steak rest for 10 minutes before cutting into it. Cover it with aluminum foil to keep it warm.

Last tip: When buying steak, I generally gravitate towards less marbling (less fat). More marbling may mean more flavor but I think it makes the meat tough and chewy, not to mention much less healthy for you. If you get a cut with the fat around the outside instead of throughout, then you can cook the steak with the fat on for the flavor and then just cut it out when you eat it. Also, you don’t have to buy filet mignon to have a good steak. You can get decent cuts of meat for a decent price if it’s just any regular weekday night. Save the splurge cuts (like filet mignon) for special occasions.

Ready for a super simple steak recipe? Here goes…

What you’ll need:
2 steaks, any cut
1 teaspoon steak seasoning

What you’ll need to do:

Place a grill pan over medium-high heat and spray with cooking spray. Get your pan really hot before you put your steaks in – searing the meat will lock in the flavor and juices. Season both sides of the meat with the steak seasoning (if you don’t have steak seasoning, just use some salt and pepper). Cook the steak for about 5 minutes on each side using the hand test to check doneness. Serve with your favorite side dishes and enjoy!

Turkey Meatballs: Part 1

Welcome to my 4-part turkey meatball series! For the next few posts, I’m going to try something new. First, I’ll give you a basic item – in this case, a turkey meatball recipe. Then, I’ll take that basic item and build on it for the next few posts to show different ways to use it in your cooking. This is a great way to do a brunt of the work on the weekend so you’ll have quick, healthy meals ready to assemble for the rest of the week.

Turkey meatballs are a great way to start. They’re really tasty with tons of flavor from the garlic, onion, and oregano. But they’re also incredibly healthy because I’ve substituted brown rice for bread crumbs, leaving the calorie count at 162 per serving with 21.4 grams of protein, 7.2 carbs, and very low sodium. And they don’t take too long to make – only about 30-45 minutes depending if you’ve already made rice or not. Not to mention, you’ll already find a lot of these ingredients in your kitchen staples. These babies are a great staple that the whole family will love.

Let’s get started with my basic turkey meatball recipe.

These are great to use in a variety of recipes, but they’re also pretty tasty to snack on, too 🙂

What you’ll need (serving size is 4 meatballs, this makes about 28 total):
1.25 pounds ground turkey – I like Jennie-O Extra Lean Ground Turkey Breast
1/2 medium white onion
5 tablespoons chopped or minced garlic
1/4 cup dried oregano
1/2 cup cooked brown rice
1 egg
Dash of salt and pepper
2 tablespoons olive oil

What you’ll need to do:

Start by cooking your brown rice. You can instant brown rice or regular brown rice, cooked over the stove or in a rice cooker. Whatever the method, you’ll want 1/2 cup rice and 1 cup of water. If you cook it over the stove, start with both the rice and water in a pot. Bring to a boil, then immediately turn the heat down to low and simmer covered for about 10 minutes.

After the rice is done, prep your space. Have a cutting board and medium mixing bowl out, a large pan on the stove, and a baking sheet covered in aluminum foil. As I roll my turkey meatballs, I put them on the baking sheet covered with aluminum foil so I can pop them in the pan at the same time – the aluminum foil helps save me from washing the dish.

Crack your egg into the medium mixing bowl and scramble. Chop your onion very fine; you want the pieces small so that they mix in well with the ground turkey and other ingredients. Add it to the egg in the medium mixing bowl along with the brown rice, garlic, oregano, S & P. Then, add the ground turkey.

Okay so I didn’t scramble my egg first in this case. Trust me, it’s better and easier if you do. I just wanted to show you what the mass of ingredients looks like.

Use your fingers to combine all the ingredients. This way, I find that you combine the ingredients more thoroughly, and (let’s face it) it’s kinda fun. Besides, your hands will be messy anyway because you must roll out your turkey meatballs with you hands.

After the ingredients are combined, tear off a small piece of the mixture and roll into a 1-inch ball in your hands. Place on the baking sheet as you go, and keep rolling the meatballs until they’re done.

Put on good music or an entertaining TV show to watch while you roll these guys. They don’t take long, but you will be standing there for a few minutes.

Turn your pan on medium-high heat and add your olive oil. Once the pan is heated, add as many meatballs as will fit in the pan. Cook for about 6-8 minutes, constantly turning and rotating to brown all sides – if you’re unsure if the meatballs are done, select the largest one and break open to see if it’s cooked through. If it’s done, feel free to enjoy a small snack. I figure it’s the chef’s prerogative to sample as he/she goes anyway! Work in batches if your pan isn’t large enough to hold all the meatballs.

These smell so good when you cook them. The garlic and onion really pop.

Enjoy! Make one of the upcoming recipes right away, or pack ’em up in a Tupperware and refrigerate to use for the rest of the week.

These would be delicious over regular or whole-wheat pasta, but I want to give you a few extra twists on a classic. So stay tuned for the following recipes:

Oven Baked Tilapia with Roasted Tomatoes and Spices

Cooking healthy, simply, and deliciously are not mutually exclusive concepts. This tilapia dish accomplishes all three in under 200 calories per serving, with actual prep time under 5 minutes, and with mostly kitchen staples – all you’ll need is a fresh tomato!

** Tip: While I pick up that fresh tomato, I pick up tons of veggies to chop and individually package as grab-and-goes for weekday lunches while my tilapia defrosts (if it’s frozen) and bakes. While my dinner cooks, I get super healthy lunches and snacks set all week!

The tomato adds the perfect amount of acidity to the fish, and roasting them adds a hint of sweetness. After you add in some chopped garlic and some dried herbs for layers of flavor, you have yourself a delicious, easy, super healthy weeknight meal.

There’s nothing better than a light dish that leaves you filling full and satisfied.

What you’ll need (makes 2 servings):
2 tilapia filets (if frozen, defrost in water like I do with chicken)
1 tomato (I prefer vine-ripe tomatoes for this)
2 tablespoons lemon juice
1 tablespoon chopped garlic
1 tablespoon dried basil
1 tablespoon dried oregano

What you need to do:

Preheat your oven to 400 degrees. Line an 8×8 casserole dish with aluminum foil and spray with cooking spray – you can use any dish size you have, you just don’t need a big one. Place your tilapia in the dish.

Cut your tomato in half and slice thinly. Layer the tomatoes over your tilapia.

Drizzle the lemon juice over your tilapia and tomatoes. Sprinkle the entire dish with the garlic, basil, and oregano.

Bake for 35 minutes.

You can barely see the tilapia under all those beautiful roasted tomatoes! But trust me, you’ll definitely get tons of flaky forkfuls when you dig in.

Enjoy! Serve with a heaping portion of steamable veggies. Or, throw in Brussels Sprouts with a Kick in the oven with the tilapia – they cook at the same temperature for the same amount of time!


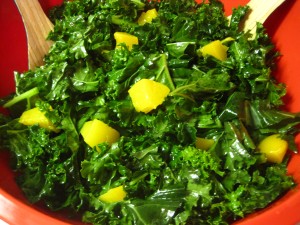
Citrusy Kale Salad with Canned Peaches

Kale is one of those super-foods you’re always hearing about. It’s a dark green, leafy veggie that’s packed full of vitamins and nutrients. Because it’s also high in fiber and low in calories, I consider kale a “free” food (as in, one you can eat and eat to your heart’s content without a worry for your waistline). For those of you who haven’t had kale, it’s basically like spinach with the crunchiness of lettuce. And paired with a citrusy-sweet, homemade dressing and canned peaches, it’s a guilt-free yummy side that makes enough leftovers for lunch.

Two giant cups of this is less than 100 calories, so eat up and enjoy!

What you’ll need:

  • 1 bunch kale (save a few stems for kale chips, recipe to come!)
  • 1 can peaches in light syrup
  • 2 tablespoons lemon juice
  • For the dressing (all from your kitchen staples):
    • 2 tablespoons honey
    • 1 tablespoon lemon juice
    • 2 tablespoons olive oil

What you’ll need to do:

Okay, I know this recipe is going to sound complicated, but it’s not. Step 1, slice kale into thin strips. Step 2, massage lemon juice in with kale. Step 3, make dressing. Step 4, slice your canned peaches and add to the kale. Step 5, toss with dressing. It’s simple, really. But here’s an in-depth step-by-step…

After you’ve washed and dried your kale, tear the leaves off the stems and slice the leaves into thin strips. *Quick tip: have your salad bowl on the counter and your trash can on the ground next to you so you can throw your sliced kale leaves in the bowl and discard your stems as you go.

This is what kale looks like so you can find it at the market. You’ll want to remove all those stems by tearing off the leaves with your hands. Then you can slice the leaves into thin strips with your knife.

Toss your sliced kale with 2 tablespoons of lemon juice and use your hands to massage the lemon juice into the kale for about a minute, kind of like how you knead bread dough. You want to massage the kale until it gets nice and soft – trust me, you’ll know when it’s done. Let it rest while you make your dressing.

In a small bowl, whisk together the honey and remaining lemon juice. Drizzle in your olive oil while you whisk to see the dressing form.

Drain your canned peaches and rinse with water. Since the dressing has honey in it already, you don’t want to add any more sweetness from the syrup. Slice into bite-sized chunks and throw in with your kale. *Quick tip: the original recipe that inspired this dish uses mango. Mango is super delicious but is more of a pain to deal with than just a simple can of peaches. But if you have the patience to peel, slice, and chop a mango, then go for it! 

Lastly, toss your kale and peaches with the dressing and serve.

Enjoy!

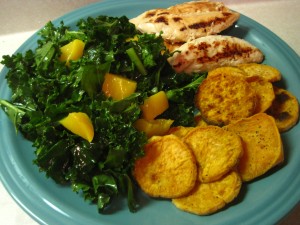
For dinner, I served my kale salad with a basic lemon chicken (see “let’s talk chicken“) and sweet potato chips (recipe to come!). After I put my chicken in the pan and popped my potatoes in the oven, I started my salad. The timing works beautifully. 

Zesty Salad Dressing and a Salad Veggie How-To

This is definitely going to be more of my more “how-to,” “knowledge-packed” posts, so brace yourselves. But I promise it takes longer to say the title of this blog post than it does to make the salad and the dressing.

Clinton and I love salads. They’re so light and crisp and refreshing that for us, healthy is just a nice benefit. And I love having a nice, bright salad as a side dish to a simple chicken dinner, especially with summer right around the corner. Salads are such a simple addition to a potluck, BBQ by the pool, or picnic in the park. So the goal of this post is to take you step-by-step through what I like to buy for my perfect side salad, how I pick out my veggies, how to chop them, and how to make a super easy, homemade dressing.

While it looks like there are a lot of steps to this salad, it's really quite quick and simple. Not to mention, all that chopping is quite the stress-reliever!

What you’ll need:

For the salad (and how to pick it your veggies at the market):

  • Head of iceberg lettuce
    • Choose a head of lettuce that’s less rust-colored on the bottom. Also, choose one that’s the most tightly bound – that’s how you know it’s the freshest.
  • 2 bell peppers – I usually do 1 red and 1 orange for color
    • Choose the bell peppers with skins that look the waxiest.
  • 4 carrots
    • Carrots are carrots. Just choose ones that look good without blemishes.
  • 6 or so stalks of celery
    • Like the lettuce, choose celery that’s the most tightly bound and without blemishes.
  • 1 medium jicama
    • What’s jicama, you ask? It’s one of my favorite additions to salad ever. It’s just like watercress, but a little bit sweet. They kind of look like a really round, hairy potato or a less-hairy coconut. To pick out a good one, just find out with the most uniform skin without blemishes or bruises.
  • 2-4 Roma tomatoes
    • Choose tomatoes that are a rich red color and without blemishes. I find that a lighter red color means they’re less flavorful.
  • 1-2 cucumbers
    • Choose cucumbers that are dark green and firm when you squeeze them.
  • 4 or so green onions
    • Choose green onions that stand straight and don’t look wilted.

All my perfect veggies, ready to go. That round, beige-looking thing next to the lettuce? That's jicama. You'll usually find it near the Asian veggies.

For the salad dressing:

What you’ll need to do:

For a salad, I always start by making the salad dressing because it gives the flavors some time to marry. In whatever container is good for salad dressing, start by combining your zesty Italian salad dressing mix, lemon juice, and sherry. Shake or stir, and then set it aside until you’re done chopping all your veggies.

I have a pretty nifty salad dressing container that Clinton's mom gave me. If you have a container with a lid (like mine), just shake to mix. I leave the mix, lemon, and sherry in there for awhile so that the flavors can marry while I chop my veggies.

Next, have your veggies all out and ready to go with a good knife, cutting board, salad bowl standing by so you can throw your veggies in as you chop them, and your trash can sitting next to you. That’s right, have your trash can right next to you when you do this. In fact, I always have my trash can right at my feet whenever I cook so that I can toss tidbits right in as I go so I don’t have a big pile of garbage on my kitchen counter and in my way.

First, make sure you wash all your veggies that aren’t going to be peeled. Now on to chopping. I try to get rid of some of the bigger veggies first so that I can have more space on my counter as I chop. This is purely by choice, there’s no real order you need to chop the veggies.

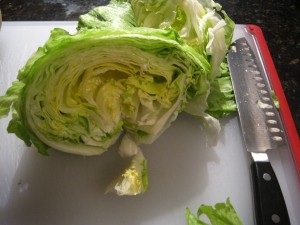
Let’s start with the lettuce. Some people say it’s taboo to cut your lettuce with a knife or it’ll get that rust-colored look where you cut it. I find that it takes way too long to tear a head of lettuce by hand, and I almost never find that it gets rust-colored around the edges when I cut it with a knife. So I start by cutting the head of lettuce in half, and then cutting out the core by cutting diagonally into the head (throw the core right into the trash can next to you). Cut the rest of the lettuce in rough chops so you have big pieces.

You can see how I take out just the core of the head of lettuce by cutting diagonally into it. This saves as much of the lettuce as possible for my salad.

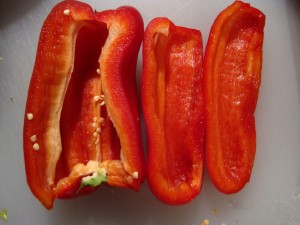
For your bell peppers, cut them in half and then use your hands to tear out the big bunch of seeds and stem towards the top of the pepper. Then, because I often find it’s easier, cut the bell pepper into quarters so that you can use your knife to cut out the ribs. Make sure you get rid of all the seeds and ribs of the bell pepper – they don’t taste so great. Then slice into big chunks.

It's easier to cut this by putting the outside part down on the cutting board (as shown) and slicing your bell peppers this way. One the half you see quartered, you can see I sliced out the ribs and seeds. Even though I used my hands to tear out the big bulk of seeds from the other half, you can still see the ribs I need to cut out.

Your tomatoes will be chopped similarly to your lettuce, actually. Cut them in half, and then use your knife to diagonally cut out the very top of the tomato – this preserves the most amount of yummy tomato meat possible. Then, chop into big pieces. I typically like to take out the seeds of the tomato because they make the salad runny (but instead of throwing them in the trash can, I pop them into my mouth as a treat!).

Like the lettuce, you can see how I cut diagonally into the tomato to save as much of the meat as possible.

Celery is super easy. Chop off the ends of the celery, and then chop into nice big chunks. I love the crunch of celery in a salad!

Your green onions are the last veggie you can chop without peeling. Make sure to cut off the ends, and then chop into smaller pieces since onions are a lot stronger tasting than many of your other veggies.

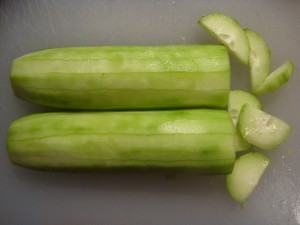
Peeling veggies isn’t my favorite, but for this salad it’s totally worth it. I start with my cucumbers because they’re super easy and because I don’t have to wash my peeler before I move onto my other veggies (jicama, on the other hand, can get messy). Completely peel your cucumbers, then cut in half lengthwise so you have a nice flat surface to work with. Then, flat-side down, cut off the ends of the cucumbers, and then slice in medium slices.

I put them flat-side down on my cutting board and then slice right through the rest of the cucumber. I like leaving the cucumbers in these bigger slices so you can really taste big bursts of them in your salad.

Now onto your carrots. Completely peel these, and then cut off the end that used to have the stem. Depending on how big your carrots are width-wise, you may want to cut them in half lengthwise like your cucumbers. But if they’re smaller, go ahead and chop in medium slices.

Lastly, onto the jicama. Now as good as jicama tastes, it’s quite the pain in the butt to peel – but so worth it. I start by cutting my jicama in half before I peel. This allows me to have a nice edge to work my peeler from because it’s definitely hard to get started. Make sure you get off all the jicama skin because it’s very hairy and not very good tasting. After it’s completely peeled, I chop it very similarly to how I chop an onion. Start by putting it flat-side down on your cutting board, and then slicing across the jicama vertically. Stack your jicama so that you can slice it again horizontally, making medium-sized chunks of jicama.

Here you can see it totally peeled and flat-side down on my cutting board. I slice all the way through the jicama (starting as shown), and then stack my slices and cut horizontally to make medium-sized chunks. Snack on a few of these pieces as you chop - it's so yummy!

By now, all your chopped veggies should be in your bowl and ready to go. Remember that salad dressing we made and set aside? Add the oil and then shake or stir. Toss with the salad, mixing up the dressing and the veggies. And you’re done!

While I normally throw my veggies in my salad bowl as I chop them, I laid them all out here so you can see what the finished product looks like. I generally like to chop my veggies in larger chunks so you get big bursts of flavor when you take a forkful.

It seems like a lot of work, but I promise it’s not. Once you get going with the chopping, it takes about as long to make this salad as it does to make a standard chicken dish (I recently made this with my Chinese BBQ chicken). And because it’s easier to make a salad like this in a large batch, you’ll have yummy, healthy, fresh leftovers all week that are a great compliment to any other dinner or are an easy lunch to bring to work. This salad is definitely a favorite in my house!

Chinese BBQ Chicken

Calling this dish Chinese BBQ chicken is slightly deceiving. It sounds way more fancy than this dish actually is. But it tastes so yummy that nobody will ever guess how simple it is. Basically, you use three ingredients: frozen chicken tenders, lemon juice, and hoisin sauce (I also throw in green onions if I have them in the fridge). That’s it!

What’s hoisin sauce, you ask? Well that’s where the Chinese BBQ component comes in, because hoisin sauce is basically Chinese BBQ sauce. As soon as you smell it, you’ll instantly recognize what it is because it’s a key ingredient in a lot of Chinese food dishes. It’s a sweet, a little vinegary, with a hint of garlic and chili peppers. The simple addition of this one ingredient to a couple kitchen staples you already have will really shake up your weeknight repertoire. It’s my epitome of an easy, healthy weeknight meal.

Hoisin sauce will keep in your cupboard for a long time, so it's definitely a good investment ingredient to have on hand.

What you’ll need:
4-5 frozen chicken tenders
2 tablespoons hoisin sauce
2 tablespoons lemon juice
3 green onions, chopped (optional, if you have them)

What you’ll need to do:

Start by heating your large pan on the stove over medium heat and spray with cooking spray. You’re going to cook the chicken exactly the same way you do in “let’s talk chicken,” so get that chicken in your pan and cover with aluminum foil.

After about 8 minutes, check your chicken – the chicken should start to look white around the edges and still pink in the middle. That’s how you know it’s ready to turn. Recover and cook for another 8 minutes.

Here's the chicken, white on the outside and pink on the inside. It's ready to flip.

Once the chicken is done, add your 2 tablespoons of hoisin sauce right on top. Throw on your green onions, and then pour in your lemon juice.

The beauty of this meal is that it's a simple twist on your basic chicken. You still mostly use kitchen staples.

Turn your chicken in the pan to cover with the sauce. Let it cook for another minute just to heat up the hoisin and cook down some of that lemon juice. And your super easy Chinese BBQ chicken is done!

It’s healthy, tasty, and I seriously can’t stress how simple this is. If you put rice in your rice cooker and a steamable bag of veggies in the microwave before you start, you have a delicious and healthy meal after a long day at work when all you want to do is crash on the couch. Not to mention, it’ll cure any craving for the much-less-healthy Chinese take out, too 🙂

Enjoy!

Quick and Easy Quinoa

Getting back to basics, quinoa is one of the best staples to have in your kitchen. Quinoa (pronounced KEEN-wah) is a super healthy, protein-packed, high-fiber grain that’s a perfect compliment to any weeknight meal (you’ve seen it pictured with my bacon, blue cheese, and spinach stuffed chicken). Added bonus: it’s gluten-free for those who have difficulty with other grains. Basically, it’s an even healthier alternative to rice because it has more protein, more fiber, and less carbs – and by healthier, I don’t mean less tasty.

This super-powered side dish is so healthy, so easy, and so awesome that it made my kitchen staples list.

The first time I had quinoa was a few years ago. My parents came home from Costco with this mystery grain. Odd, I thought, but I’m not picky so I tried it. Surprisingly, it wasn’t bad. And that was before we even put anything in it (my mom had cooked it plain with just water like we’re used to dong with rice). After finding out how incredibly healthy this grain is, I’ve played with different ways of cooking it and come up with some pretty yummy ideas while keeping it super nutritious.

So, rather than a traditional recipe this time, I’m going to share some ideas. For the basic starter of any quinoa…

What you’ll need:

1 part quinoa
2 parts water

What you’ll need to do:

Put your water and quinoa together in a pot on the stove starting at room temperature. Set the heat over high, and watch until your water boils rapidly. As soon as your water boils, immediately turn the heat down to low and cover your pot. After about 10 minutes, you should see little tendrils spiraling away from your quinoa – that’s how you know it’s done (see the top picture for a close up). It’s as simple as that!

I make this one on the stove because I like to keep an eye on those tendrils. But it's so easy that you can do it right next to your grill pan when you're making some yummy chicken or fish.

Okay now for some fun ideas. Quinoa by itself is okay tasting, but it honestly doesn’t knock anything out of the park. To add some fun flavor without sacrificing nutrition, here are some ideas:

  1. Add a couple tablespoons of lemon juice and lemon pepper! This adds a citrus flavor that brightens up your grain and pairs perfectly with fish or your healthy, yummy chicken piccata. Besides, these are in your kitchen staples anyway.
  2. Add a couple tablespoons of light balsamic vinaigrette. Seriously, it’s hard to guess that the balsamic vinaigrette is even in there, but it really elevates the flavor of an otherwise-slightly-boring side dish. This is what I paired with my bacon, blue cheese, and spinach stuffed chicken.
  3. Add a couple tablespoons of soy sauce. Again, it’s in your kitchen staples anyway, and it’s a great addition to pair with your mango chicken.

No matter what you put in it, quinoa is a perfect side dish when you’re looking for something super healthy and super easy. And if you shop at Costco, it’s pretty inexpensive (seriously, Costco is the best)! Better yet, quinoa is not only great as a side dish, but it’s also a fantastic high-protein addition to a salad. But more where that’s coming from another time 🙂

Pictured here with my bacon, blue cheese, and spinach stuffed chicken. Yum, yum, yum....

Enjoy!