Healthier Hummingbird Muffins

There’s this divine, mouth-watering cupcake place not too far from my office that first turned me onto “hummingbird” baked goods. Their scrumptious hummingbird cupcakes are filled with fresh banana, pineapple chunks, and vanilla – three of my favorite flavors. For the sake of my skinny jeans, I only allow myself to pass through this cupcake place very rarely and let myself have a hummingbird cupcake as a treat. So when I saw a recipe for hummingbird muffins in one of my running magazines, I jumped at the opportunity of making a more figure-friendly version of one of my favorite indulgences (in fact, I went to the grocery store at 7:00 a.m. the next morning to get a couple ingredients I didn’t have just so I could make them that day).

These hummingbird muffins absolutely fill the craving for a sweet, delicious treat without any of the guilt. I swap sugar for Splenda in this recipe, and I top them with oats and nuts instead of frosting like their cupcake counterparts. Healthier honey and fruits ratchet the sweetness factor up many notches, so it’s an easy swap for a tempting donut or danish. Plus, baking these in cupcake tins makes this the perfect breakfast to go. Enjoy with a hot cup of coffee and get your morning off to a delicious, healthy start!

Delicious, sweet, and much better for you than any donut!

Delicious, sweet, and much better for you than any donut!

What you’ll need:

For the muffins:

  • 1 cup Splenda
  • 1/3 cup honey
  • 2 large eggs
  • 1/4 cup canola oil
  • 1/2 cup unsweetened applesauce
  • 1/2 cup crushed, drained pineapple
  • 2 very ripe bananas
  • 2 teaspoons vanilla
  • 1 3/4 cups all-purpose flour
  • 1 teaspoon salt
  • 1 teaspoon baking powder
  • 1/2 teaspoon baking soda
  • 1 teaspoon cinnamon
  • 1/2 cup chopped pecans

For the crumble:

  • 1/2 cup steel-cut oats (not instant)
  • 1/4 cup finely chopped pecans
  • 1 tablespoon honey
  • 1 tablespoon margarine, melted
  • 3 tablespoons brown sugar
  • Pinch salt
  • 1 tablespoons all-purpose flour

What you’ll need to do:

Preheat your oven to 350 degrees. Combine sugar and honey in a large bowl, microwave at 50% power for about 45 seconds and then stir.

This is what your honey-sugar mixture should look like after it's heated and combined.

This is what your honey-sugar mixture should look like after it’s heated and combined.

Whisk in eggs one at a time until smooth. Add oil and applesauce and whisk. Add fruits and vanilla and whisk again. The mixture should be mostly smooth with only small chunks of banana and pineapple. Set this mixture aside.

In another mixing bowl, combing flour, salt, baking powder, baking soda, cinnamon, and pecans.

Add the dry mixture to the wet mixture a little at a time, stirring constantly.

In a separate bowl, combine all the crumble ingredients and set aside.

This is what your crumble should look like.

This is what your crumble should look like.

Prep two cupcake trays with nonstick spray or liners (I used liners). Lesson learned when I made these – they’re really sticky so if you decide to go the spray route, make sure you spray the pan really well! Fill each cup about 3/4 full. Sprinkle the crumble mixture on top.

I like cooking these in cupcake tins so that I can have 1, or even 2 if I'm extra hungry, without feeling guilty.

I like cooking these in cupcake tins so that I can have 1, or even 2 if I’m extra hungry, without feeling guilty.

Bake for about 15-20 minutes or until a toothpick comes out clean.

Enjoy!

**Need to do something else with those steel-cut oats? Try out my Perfect Oatmeal or my Overnight Oatmeal with Bananas and Coconut Milk.

Irish Stew with Guinness, Beef, and other Yummy Goodness

Last month I took a wonderful week-long trip to Ireland. While many people look forward to seeing the sights, I may be the only person to ever look forward to Irish food. In a perfect world where calories don’t matter, pub grub would be my main food group. While in Ireland, I ate an abundance of fish and chips, mashed peas, shepherd’s pie, and Irish stew while I listened to musicians play traditional Irish music in cozy little pubs – of course, all paired perfectly with a rich, delicious pint of Guinness. As the trip came to an end, so did my lavish eating of hearty, tasty pub grub. But with St. Patrick’s Day only two days away, I’m bringing it back for the special occasion.

You may think I’m crazy and think that Irish food is bland, but I will prove otherwise. This Irish stew has an amazing depth of flavor, layered with the smokey, chocolatey Guinness, fruity red wine, earthy thyme, spicy garlic, and sweet onion and carrot. Of course, you couldn’t have a hearty Irish stew without potatoes. It takes a little bit of time and love, but this dish is really easy to make. Whether you’re Irish or not, throw it on the stove this Sunday and celebrate the holiday.

Delicious, hearty goodness.

Delicious, hearty goodness.

What you’ll need:
1/4 cup olive oil
1 1/4 – 1 1/2 pounds beef stew meat, cut into 1-inch pieces
6 teaspoons minced garlic (6 cloves)
6 cups beef broth
1 cup of Guinness
1 cup of red wine
3 tablespoons tomato paste
1 tablespoon sugar
2 tablespoons dried thyme
2 tablespoons Worcestershire sauce
3 bay leaves
2 tablespoons butter or margarine
3 pounds russet potatoes, peeled, cut into 1/2-inch pieces (about 7 cups)
1 large onion, chopped
5 carrots, peeled, cut into 1/2-inch pieces (about 2 cups)
Salt and pepper
2 tablespoons parsley (optional)

What you’ll have to do:

Find the biggest pot or Dutch oven you have, at least 5 quarts. Heat the pot over medium-high heat and add the olive oil. Salt the beef and add to the pot. Spread them out as much as you so that they make up one layer. Brown the meat on one side for about 3 minutes and then use tongs to turn the pieces over to brown on the other side. Continue cooking in this manner until all sides are browned.

If the pot is crowded (like mine), turn the heat up to high and cook for a shorter amount of time so the meat browns, not steams.

If the pot is crowded (like mine), turn the heat up to high and cook for a shorter amount of time so the meat browns, not steams.

Add garlic to the beef and saute for one minute. Add the beef broth, Guinness, red wine, tomato paste, sugar, thyme, Worcestershire sauce, and bay leaves. Stir the mixture to combine. Bring it to a boil then reduce heat to medium-low. Cover and cook for one hour, stirring occasionally.

This looks super brothy, but it will cook down while it simmers a bit. The potatoes also thicken it up later.

This looks super brothy, but it will cook down while it simmers a bit. The potatoes also thicken it up later.

**You only need one cup of Guinness, so enjoy the rest while you’re cooking!

While the meat and stock are simmering, put another large pan or pot over medium heat and melt your butter. While the pot heats, peel and chop your potatoes.  Add your potatoes to the pan in batches as you chop them. Turn the potatoes in the pan every few minutes to evenly cook them. As soon as you get the potatoes in the pan, start on the carrots. Peel and chop your carrots and fold them into the potatoes so the mixture can evenly cook. Once the carrots are in, chop the onion and add it to the mixture. Let the potato, carrot, and onion mixture cook on medium heat for about 20 minutes or until soft.

Use a much bigger pan than I did! Turn the veggies over constantly so that they evenly cook.

Use a much bigger pan than I did! Turn the veggies over constantly so that they evenly cook.

**I like to get the potatoes in the pan as early as possible. If there’s one thing I hate more than anything else, it’s an undercooked potato.

After the beef and stock have simmered for one hour, add the vegetables to the stew. Simmer uncovered until the vegetables and beef are very tender, or for about 40 minutes. If the stew looks really thin or watery when you first add the vegetables, have no fear – the starch from the potatoes thickens it up. Add salt and pepper to taste, and top with parsley for a pop of color.

Enjoy!

If you’re looking for other fun St. Patrick’s Day recipes, try my Sweet Potato and Turkey Chili Shepherd’s Pie or my Chocolate Guinness Cupcakes!

Healthy, Easy Slow Cooker Jumbalaya

Andouille sausage, shrimp, brown rice, loads of veggies, and a kick of hot sauce … need I say more? This simple slow cooker dish is packed with flavor and texture. It’s perfect for a lazy Sunday at home while we wait for the weather to turn slightly nicer, and it makes delicious grab-and-go leftovers to pack for lunch during the week.

The best part is that it’s healthy, though you’d never guess it. You can add whatever veggies you have lying around the kitchen that need to be eaten, and the hefty dose of satiating protein and healthy whole grains keep you from heading back to the fridge for a midnight snack. It’s a fun dish to throw into the week’s lineup!

This dish is a quadruple threat: delicious, hearty, healthy, and easy to make!

This dish is a quadruple threat: delicious, hearty, healthy, and easy to make!

What you’ll need:
1 large onion, chopped
3 tablespoons (or cloves) garlic, minced
3 stalks celery, chopped
2 carrots, chopped
2 medium bell peppers, chopped – I used sweet red bell peppers
1 can (15 ounce) crushed tomatoes
1 cup brown rice
1 package (12 ounce) andouille sausage, cut into 1/2 inch rounds – use turkey or chicken sausage if possible
1 teaspoon hot sauce – I used sriracha
2 tablespoons thyme, minced – fresh or dried
1 teaspoon salt
1/2 teaspoon black pepper
2 cups water
3 tablespoons parsley, minced – fresh or dried
1 pound shrimp, peeled and deveined

What you’ll need to do:

Start by chopping and mincing all your veggies.

Place the onion, garlic, celery, carrots, peppers, tomatoes, rice, and sausage in your slow cooker in that order. Add the hot sauce, thyme, salt, pepper, and water.

Cover and cook on low for about 9 hours.

In the last hour of cooking, add your shrimp and parsley. Stir to combine.

Enjoy!

Mom’s Crazy Chili

Nothing sounds better on a freezing cold night than a big bowl of chili. It’s warm, hearty, delicious comfort food – but it can be healthy comfort food! The best thing about chili is that you can pretty much add whatever ingredients you want as long as you have the basics: meat, beans, beer, and the right spices (that’s right: beer).

I may be biased, but I believe my mom makes the best chili. When I called her to ask her for the recipe (for about the 15th time), she replied, “Well, I just add a little of this and a little of that.” I asked, “Well do you know how much chili powder or cumin you add?” She answered, “I add enough to make it taste good.” So I improvised. That’s why I call it my mom’s crazy chili recipe – there really isn’t any set recipe. But those basics I mentioned are in there, and that’s the key. I also truly believe that beer is the secret ingredient to setting this one over the top.

I’m going to break down necessary ingredients and optional ingredients. I’ll also give you healthy and indulgent options. Lastly, you can make this either on the stove or in the crock pot, so I’ll give you both options there, too. However, there is one area where you don’t have an option: you cannot make just a little bit of chili. You have to make a giant pot. But that’s a good problem to have because chili makes the best leftovers!

This one was hard to tag because you can make it as healthy as you want! As long as you have the basics, it's delicious.

This one was hard to tag because you can make it as healthy as you want! As long as you have the basics, it’s delicious.

What you’ll need:

Necessary ingredients:

  • 2 tablespoons olive oil
  • 1-1.25 pounds ground meat – use ground turkey for a healthier option, but I love the taste of ground beef.
  • 1 large onion, chopped
  • 4 teaspoons minced garlic – not necessary to have fresh garlic, but garlic in general is necessary. Use more garlic powder if you don’t use fresh garlic.
  • 1 tablespoon garlic powder – garlic powder is necessary, even if you use fresh garlic. If you don’t use fresh garlic, too, then triple the garlic powder.
  • 4 tablespoons cumin
  • 4 tablespoons chili powder
  • 3 bay leaves
  • 28 ounce can crushed tomatoes
  • 1 can or bottle of dark beer – ales, nut browns, stouts, or porters are the best. In a pinch, you can use a light beer, but stay away from IPAs.
  • 2 cans red kidney beans, rinsed

Optional ingredients:

  • Bell peppers, chopped – I like green because it adds color; I use 2 bell peppers
  • Cayenne pepper – adjust the amount to make it more or less spicy; I use 1/2 teaspoon
  • Celery, chopped – it adds a nice crunch to the chili, just use however much you have in the fridge
  • Carrots, chopped – it adds a little sweetness to the chili, again, use however much you have in the fridge
  • Bacon, crumbled – either turkey bacon or regular bacon is delicious, turkey bacon is healthier
  • Rice – it’s traditional in my family to serve chili over rice
  • Cheddar cheese – I love topping my chili with cheese!

What you’ll need to do:

Brown your meat in the two tablespoons olive oil over medium-high heat on the stove for about 5-7 minutes. If you’re going to use a crock pot, use a large pan. If you’re going to make the chili in a pot on the stove, just brown the meat in the pot. As the meat is browning, constantly break it apart with a wooden spoon. You want the meat to be smaller crumbles instead of large chunks.

Or, as an alternative, cook the bacon in the pan first. Cut or tear the bacon into smaller pieces and put them in the pan so that they cook faster and so you don’t have to crumble it later. If you’re cooking turkey bacon, cook the turkey bacon in the olive oil. If you’re cooking regular bacon, don’t put any oil in the pan. Then brown your meat in the same pan with the bacon drippings.

When the meat has browned, turn the heat down to medium and add the onion. If you’re using fresh garlic or bell peppers, add those at this time, too. Cook for about 3 minutes or until the onion has turned translucent. Add all your dry spices, except the bay leaves, and stir with the spoon until the spices thoroughly coat the meat and veggies.

I used turkey chili here, but the spices added the darker color.

I used turkey chili here, but the spices added the darker color.

If you’re cooking in a crock pot, transfer the meat and veggies into the crock pot. Add the can of crushed tomatoes, beer, and bay leaves, either in the crock pot or big pot on the stove. Stir to mix.

Cover and let cook for many hours. If you’re using the crock pot, set on low heat for at least 6 hours – you can let this cook all day if you’re making it on a work day. If you’re cooking on the stove, turn the heat to low and let simmer for at least 4 hours, stirring occasionally. The chili generally tastes better the longer you let it cook.

This will make your house smell wonderful all day!

This will make your house smell wonderful all day!

In the last hour of cooking, add your kidney beans. You can also add celery or carrots at this time if you’re using them. Stir and cover.

I love serving my chili over rice and topping it with cheddar cheese. In my family, we’ve also been known to put chili over tamales, but that may be a Southern California thing. Of course, chili is also delicious on hot dogs, fries, or other ballpark food. I’ve also heard of people putting chili over noodles. If you want to make it healthier, chili would also be good over quinoa. But you don’t have to pair it with anything at all – this chili is also delicious all by itself.

Enjoy!

Thanksgiving: The Turkey

When I first offered to host Thanksgiving, nothing intimidated me more than cooking the turkey. Potatoes and stuffing are easy and very forgiving with flavors and cooking time. And besides, turkey is the main event. But I’ve tasted way too many dry, overcooked turkeys in my life to think I could cook one easily.  How do I defrost the damn thing? How long do I cook it? What kind of seasonings do I use? Is it the stuffing that adds the flavor? (Remember, I don’t like stuffing in the turkey). How do I get the crispy outside and juicy inside? I was lost. I read recipe after recipe trying to figure out the trick to keeping it moist and tasty. And, I admit, I called the Butterball Hotline. My fears weren’t assuaged, but I figured there was nothing left for me to do but jump in and give it a shot.

I narrowed down my recipe collection to one basic, easy-looking recipe. I figured it was a good start and I could always add more or edit later if I needed to. By some stroke of luck, it was delicious. The turkey was crispy on the outside and juicy on the inside. And I have used the same turkey recipe without any changes or additions every year since.

The trick, I learned, is brining. Soaking the turkey overnight in a sugar-salt mixture makes the turkey super juicy, and I don’t really add much seasoning past that!

It turns out that cooking a delicious, juicy turkey is really easy. It takes a long time, but not a lot of attention. So if you’ve ever been too afraid to cook a turkey, fear no more. Give it a try and I promise you’ll find it’s a lot easier than you think.

Golden-brown, juicy, and delicious. There's never a reason to be scared of cooking a turkey again!

Golden-brown, juicy, and delicious. There’s never a reason to be scared of cooking a turkey again!

What you’ll need:
2 gallons water
2 cups salt
1 cup brown sugar
1 12-13 pound turkey
8 tablespoons butter
4 tablespoons garlic salt
4 tablespoons Italian seasoning
2 small onions
4 stalks celery

**Tip: You can scale the ingredients up or down based on the size of your turkey.

What you’ll need to do:

The night before Thanksgiving, start by cleaning and brining the turkey. Remove everything from the cavity (giblets, neck, and plastic bag) and discard. Place the turkey in the sink and thoroughly rinse the inside cavity and skin with cool water. This helps remove any bacteria within the cavity or on the skin.

In a very large pot, heat about 2 quarts of water, salt, and sugar over high heat. Stir until the salt and sugar dissolve. Add the remaining gallon and a half of water to help it cool faster. Cool to room temperature then submerge the turkey in the brine. This takes about an hour to prepare the brine, so don’t do it too late! Refrigerate overnight.

Be careful, that thing is heavy!

Be careful, that thing is heavy!

Remove the turkey from the brine. Pat the turkey dry and place in a roasting pan. Brush the turkey all over with melted butter, and season with garlic salt and Italian seasoning. Cut your two small onions in half and remove the skins. Cut the celery stalks into 4 pieces each. Stuff the turkey cavity with the onion halves and celery stalks for added taste and juiciness.

This guy is ready to go in the oven!

This guy is ready to go in the oven.

Put the turkey in the oven at 325 degrees. Here’s a timetable for roasting the turkey from the USDA:

  • 8 to 12 lbs: 2 3/4 to 3 hrs
  • 12 to 14 lbs: 3 to 3 3/4 hrs
  • 14 to 18 lbs: 3 3/4 to 4 1/4 hrs
  • 18 to 20 lbs: 4 1/4 to 4 1/2 hrs
  • 20 to 24 lbs: 4 1/2 to 5 hrs

Every hour or so, brush the turkey with more melted butter. This makes the skin nice and crispy. Cook to an internal temperature of 165 degrees.

**Tip: I can’t stress the importance of having a good meat thermometer. They’re not expensive, but they really help when cooking meat in the oven. They save you from having to cut open the meat to check doneness and letting the juices all run out!

After the turkey is done cooking, transfer to a cutting board and tent loosely with aluminum foil. Let it rest for about 30 minutes before carving.

Enjoy!

Turkeys don’t have to be cooked only for Thanksgiving. Try cooking one in the off-season. I already have a couple small turkeys in my freezer waiting for a good winter weekend.

Sourdough Bread Stuffing

One thing I love about hosting and cooking the entire Thanksgiving menu is that I can choose what dishes I want on my table. Traditionally, we have had stuffing that was cooked inside the turkey and came out (in my opinion) soggy, colorless, and boring – it was definitely not my favorite Thanksgiving side dish. Since I have cooked my own Thanksgiving dinner and had complete control over the menu for the past few years, I have been making a new Sourdough Bread Stuffing that’s packed with flavor, has a nice crispy texture on top, and has definitely become a favorite on the menu.

Perhaps it’s the Californian in me, but I love sourdough bread. It adds so much more flavor to the stuffing than regular white bread. Fresh thyme and sage make this taste like an expensive, gourmet dish. And since the stuffing is baked in a casserole dish instead of inside a bird, it gets a golden-brown crisp on top that gives the dish a nice texture.

I was excited to share this new tradition with my family when they came out to visit for Thanksgiving this year. Of course, my mom thought I was insane for changing a Thanksgiving tradition, but I insisted on making my sourdough stuffing anyway. My brothers, however, couldn’t be more delighted. It was the first time I remember seeing them get seconds of stuffing at Thanksgiving! And sure enough, I converted my mom into an outside-the-bird-stuffing lover, too.

The sourdough bread is what makes this dish so special!

The sourdough bread is what makes this dish so special!

What you’ll need:
1 pound loaf sourdough bread
8 tablespoons butter or margarine
4 stalks celery, halved lengthwise and sliced
1 medium onion, chopped
10 sprigs thyme, leaves stripped from the stems
12 fresh sage leaves, chopped
3 1/2 cups low-sodium chicken broth
3 tablespoons chopped Italian parsley leaves

What you’ll need to do:

Preheat the oven to 350 degrees. Spray a 2-quart baking dish with cooking spray and set aside.

Cut or tear the bread into 1-inch cubes and spread it evenly on a baking sheet. I recommend cutting instead of tearing the bread, because tearing sourdough bread can also tear apart your fingers. Toast the bread in the oven until completely dry and beginning to crisp and brown, or for about 20 minutes.

These don't have to be perfect cubes, just cut them roughly. I think it makes the dish a little more rustic anyway!

These don’t have to be perfect cubes, just cut them roughly. I think it makes the dish a little more rustic anyway!

In a large skillet over medium-high heat, melt 4 tablespoons of butter and add your onion and thyme. Stir frequently until the onion has turned clear, or about 5 minutes. Add the sage and remaining 4 tablespoons of butter. After the butter has melted, add the chicken broth and celery and stir to combine.

Transfer the toasted bread to a large mixing bowl. Pour the chicken broth mixture over the bread crumbs and toss to combine until the bread cubes absorb the liquid. Pour the mixture into your baking dish and sprinkle with parsley.

This is one dish that will make your house smell AMAZING while cooking.

This is one dish that will make your house smell amazing while it’s cooking.

Bake for 40 minutes or until the top is golden-brown. Remove from the oven and allow the stuffing to cool for about 15 minutes before serving.

Enjoy!

Sandy’s Sweet Potatoes in Orange Cups

Every Thanksgiving, there is one dish I look forward to more than anything else because I only get it once a year on Thanksgiving Day: Aunt Sandy’s sweet potatoes in orange cups. Unfortunately, I haven’t been able to travel back to California for Thanksgiving for the past few years so I haven’t been able to enjoy the dish from Aunt Sandy herself. So, I begged her for the recipe so I could make them myself.

I love these sweet potatoes because they’re different than the traditional heaps of sugary, one-note sweet potato casserole. These come in little individual servings inside hollowed out orange peels, which is not only convenient but also gives the sweet potatoes a little citrusy kick. I love the citrus in these because it cuts the over-the-top sweetness. Don’t worry, I still add marshmallows and this could still pass as a dessert. But the orange adds another layer of flavor to an otherwise simply sweet dish.

This delicious side dish comes in individual servings and tastes like candy. Yum!

This delicious side dish comes in individual servings and tastes like candy. Yum!

What you’ll need:
8 sweet potatoes
1 stick of butter or margarine, melted
1/2 cup brown sugar
1/4 cup white sugar
2 teaspoon cinnamon
1/4 teaspoon nutmeg
1/4 teaspoon ground cloves
12 oranges
4 eggs, beaten

What you’ll need to do:

Start by boiling the sweet potatoes in their jackets in a large pot of water for about 45 minutes. Poke the sweet potatoes with a fork to check tenderness.

While the potatoes boil, cut your oranges in half, juice them, and then scoop out the flesh. This is by far the most time-consuming part of the job – luckily I had my Mom here to help me this year! Be very careful of scooping out the flesh because you don’t want to tear the orange cups. Save the juice because you’ll need it later. Arrange the hollowed out orange cups in a casserole dish.

When the sweet potatoes are soft, peel the skin from them and mash. Add the butter and mix with an electric mixer. Add the eggs. Next, add the sugar and spices. Add 1/4 cup orange juice from your reserves to the mixture – the rest of the fresh-squeezed orange juice is a treat for the chef! Mix the potato mixture thoroughly.

Scoop the sweet potato mixture into the orange cups. Cook for 40 minutes on 350 degrees.

You can even make these ahead of time and freeze them!

You can even make these ahead of time and freeze them!

When you have about 10 minutes left in cooking, top the sweet potatoes with marshmallows and pop them back in the oven.

Enjoy!

Skinny Scalloped Potato Gratin

White potatoes don’t have to be super sinful, and Thanksgiving is bad enough with all the other starches and sweets. So this year I wanted to take a healthy twist on the traditional Thanksgiving mashed potatoes. And since I was already making a version of mashed sweet potatoes, I wanted to change it up with scalloped potatoes. I found this healthy recipe on another cooking blog I follow, and it looked so tasty I had to try it.

Potatoes are my ultimate comfort food, and these are dripping with gooey sharp cheddar cheese and spiced with fresh thyme. You would never guess that it’s on the lighter side of the menu! This potato dish is sure to become a Thanksgiving staple in my family.

Yes, it is as delicious as it looks.

Yes, it is as delicious as it looks.

What you’ll need:

6 medium yukon gold potatoes
2 tablespoons melted butter
1/2 teaspoon garlic powder
Salt and pepper to taste
1 cup shredded reduced fat sharp cheddar cheese
1 cup fat free milk
1 bay leaf
pinch nutmeg
2 teaspoons fresh thyme

What you’ll need to do:

Preheat oven to 425 degrees. Spray an 11×7″ baking dish with cooking spray.

Peel your potatoes, then slice them as thinly as you can get them – aim for 1/8 inch thick.

In a large bowl, combine potatoes, butter, garlic powder, salt, and pepper.

Use a large sharp knife to cut the potatoes. If you have a good mandolin, you can use that instead to make thin slices.

Use a large sharp knife to cut the potatoes. If you have a good mandolin, you can use that instead to make thin slices.

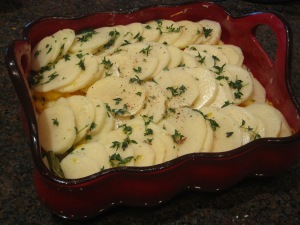
Arrange half of the potato slices in the baking dish, then top with 1/3 cup cheese. Add the remaining potatoes.

In a small saucepan, bring milk, thyme, bay leaf, and nutmeg to a boil. Pour over potatoes. Top the potatoes with the remaining cheese and bake uncovered for about 45 minutes or until potatoes are tender.

Potatoes drenched in milk mixture before I added the cheese.

Potatoes drenched in milk mixture before I added the cheese.

Enjoy!

Pumpkin Pie

I love Fall because it gives me the excuse to eat pumpkin everything. There’s pumpkin spice lattes, pumpkin bread, pumpkin spice Ghirardelli chocolates, and – the greatest of all – pumpkin pie.

This year I was ambitious with my pumpkin pie because I made it from a fresh pumpkin. Normally I use canned pumpkin, but a trip to a pumpkin farm earlier this Fall inspired me. I was surprised at how easy it was! It’s a little more time consuming than simply opening a can, but it was well worth the extra effort. Not only did I get delicious pumpkin meat for my pie, but I also roasted the pumpkin seeds. Needless to say, there was no leftover pumpkin pie this Thanksgiving!

I admit, I usually use a lot more whipped cream than this but it didn't make for a pretty picture. Yum!

I admit, I usually use a lot more whipped cream than this but it didn’t make for a pretty picture. Yum!

What you’ll need:
1 small fresh sweet sugar pie pumpkin OR 1 can pumpkin
2 eggs slightly beaten
3/4 cup sugar
1/2 teaspoon salt
1 1/2 teaspoon cinnamon
1/2 teaspoon ginger
1/4 teaspoon cloves
1 12-ounce can of evaporated milk
1/2 cup chopped pecans (optional).
1 unbaked pie shell

What you’ll need to do:

Preheat your oven to 425 degrees. Spray a pie pan with cooking spray and lay out your pie shell. I like to press the chopped pecans into the crust!

I love the surprise nuttiness of the pecans!

I love the surprise crunchiness of the pecans!

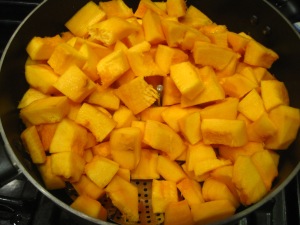
If you use fresh pumpkin, start by carving out all the pumpkin meat. I cut my pumpkin into small strips and then cut off the outer shell. I then cut the pumpkin meat into cubes and put it in a large pot of water with a steaming basket. Put about a cup of water in a large pot on your stove with the pumpkin meat in the steaming basket and turn the heat on high. Cover and steam your pumpkin for about 15 minutes or until tender.

Steaming the pumpkin is better than boiling because it helps the pumpkin retain its flavor.

Steaming the pumpkin is better than boiling because it helps the pumpkin retain its flavor.

When your pumpkin is tender, put it in a food processor or blender and pulse until smooth. Measure out 1 cup of the pumpkin puree for the pie. Freeze the rest for another recipe later.

Freezing the leftovers is great for future pumpkin bread or muffins!

Freezing the leftovers is great for future pumpkin bread or muffins!

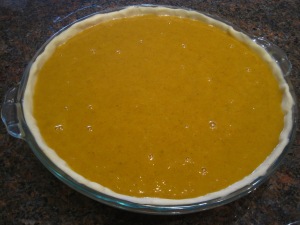
Mix all ingredients together and pour into the unbaked pie shell. Bake at 425 degrees for 15 minutes, then turn the temperature down to 350 degrees. If you use fresh pumpkin, bake for an additional hour. If you use canned pumpkin, bake for 45 minutes.

Be careful of spilling, the pie batter is very thin when you put it in the oven.

Be careful of spilling, the pie batter is very thin when you put it in the oven.

Cool and serve with whipped cream.

Delicious. I almost can't wait for it to cool before I have a slice.

Delicious. I almost can’t wait for it to cool before I have a slice.

Enjoy!

Aunt Gwen’s Pecan Pie

There are a few perks to growing up in a great big Southern family. Growing up, I learned Southern hospitality, manners, traditions, and – most importantly – I was spoiled with Southern food. I’ve traveled to the South to visit extended family a few times. One of my fondest memories was traveling to Granbury, Texas to visit my great-aunt and -uncle who lived on a pecan plantation. I was very young at the time, but I enjoyed touring the plantation with my Uncle Frank on his golf cart with his dog, Buffy – he even let me drive a little! My Aunt Gwen spoiled us in the mornings with pecan-crusted sticky buns and family stories.

Years later when I needed pie recipes, I knew exactly who to ask. You can’t beat getting a pecan pie recipe from a Southern woman who lived on a pecan plantation! I’ve made Aunt Gwen’s pecan pie recipe for many years, and it’s definitely a favorite in my house. And it’s so easy to make!

I love making this pie for many special occasions. It's a real crowd-pleaser, and it's so easy!

I love making this pie for many special occasions. It’s a real crowd-pleaser, and it’s so easy!

What you’ll need:
3 eggs, slightly beaten
1 cup sugar
1 tablespoon flour (rounded)
3/4 cup dark Karo
1/4 cup light Karo
3 tablespoons butter
1 cup pecans
1 tsp vanilla
1 unbaked pie shell

What you’ll need to do:

Preheat your oven to 350. Spray a pie pan with cooking spray and then lay out your pie shell.

Mix all of the ingredients in a bowl. Pour into the pie shell.

Perfectly delicious.

Perfectly delicious.

Bake for 1 hour.

Enjoy!

**Tip: To make this pie sugar-free, just replace one cup of sugar-free syrup instead of the light and dark Karo.