Healthier Hummingbird Muffins

There’s this divine, mouth-watering cupcake place not too far from my office that first turned me onto “hummingbird” baked goods. Their scrumptious hummingbird cupcakes are filled with fresh banana, pineapple chunks, and vanilla – three of my favorite flavors. For the sake of my skinny jeans, I only allow myself to pass through this cupcake place very rarely and let myself have a hummingbird cupcake as a treat. So when I saw a recipe for hummingbird muffins in one of my running magazines, I jumped at the opportunity of making a more figure-friendly version of one of my favorite indulgences (in fact, I went to the grocery store at 7:00 a.m. the next morning to get a couple ingredients I didn’t have just so I could make them that day).

These hummingbird muffins absolutely fill the craving for a sweet, delicious treat without any of the guilt. I swap sugar for Splenda in this recipe, and I top them with oats and nuts instead of frosting like their cupcake counterparts. Healthier honey and fruits ratchet the sweetness factor up many notches, so it’s an easy swap for a tempting donut or danish. Plus, baking these in cupcake tins makes this the perfect breakfast to go. Enjoy with a hot cup of coffee and get your morning off to a delicious, healthy start!

Delicious, sweet, and much better for you than any donut!

Delicious, sweet, and much better for you than any donut!

What you’ll need:

For the muffins:

  • 1 cup Splenda
  • 1/3 cup honey
  • 2 large eggs
  • 1/4 cup canola oil
  • 1/2 cup unsweetened applesauce
  • 1/2 cup crushed, drained pineapple
  • 2 very ripe bananas
  • 2 teaspoons vanilla
  • 1 3/4 cups all-purpose flour
  • 1 teaspoon salt
  • 1 teaspoon baking powder
  • 1/2 teaspoon baking soda
  • 1 teaspoon cinnamon
  • 1/2 cup chopped pecans

For the crumble:

  • 1/2 cup steel-cut oats (not instant)
  • 1/4 cup finely chopped pecans
  • 1 tablespoon honey
  • 1 tablespoon margarine, melted
  • 3 tablespoons brown sugar
  • Pinch salt
  • 1 tablespoons all-purpose flour

What you’ll need to do:

Preheat your oven to 350 degrees. Combine sugar and honey in a large bowl, microwave at 50% power for about 45 seconds and then stir.

This is what your honey-sugar mixture should look like after it's heated and combined.

This is what your honey-sugar mixture should look like after it’s heated and combined.

Whisk in eggs one at a time until smooth. Add oil and applesauce and whisk. Add fruits and vanilla and whisk again. The mixture should be mostly smooth with only small chunks of banana and pineapple. Set this mixture aside.

In another mixing bowl, combing flour, salt, baking powder, baking soda, cinnamon, and pecans.

Add the dry mixture to the wet mixture a little at a time, stirring constantly.

In a separate bowl, combine all the crumble ingredients and set aside.

This is what your crumble should look like.

This is what your crumble should look like.

Prep two cupcake trays with nonstick spray or liners (I used liners). Lesson learned when I made these – they’re really sticky so if you decide to go the spray route, make sure you spray the pan really well! Fill each cup about 3/4 full. Sprinkle the crumble mixture on top.

I like cooking these in cupcake tins so that I can have 1, or even 2 if I'm extra hungry, without feeling guilty.

I like cooking these in cupcake tins so that I can have 1, or even 2 if I’m extra hungry, without feeling guilty.

Bake for about 15-20 minutes or until a toothpick comes out clean.

Enjoy!

**Need to do something else with those steel-cut oats? Try out my Perfect Oatmeal or my Overnight Oatmeal with Bananas and Coconut Milk.

Mom’s Crazy Chili

Nothing sounds better on a freezing cold night than a big bowl of chili. It’s warm, hearty, delicious comfort food – but it can be healthy comfort food! The best thing about chili is that you can pretty much add whatever ingredients you want as long as you have the basics: meat, beans, beer, and the right spices (that’s right: beer).

I may be biased, but I believe my mom makes the best chili. When I called her to ask her for the recipe (for about the 15th time), she replied, “Well, I just add a little of this and a little of that.” I asked, “Well do you know how much chili powder or cumin you add?” She answered, “I add enough to make it taste good.” So I improvised. That’s why I call it my mom’s crazy chili recipe – there really isn’t any set recipe. But those basics I mentioned are in there, and that’s the key. I also truly believe that beer is the secret ingredient to setting this one over the top.

I’m going to break down necessary ingredients and optional ingredients. I’ll also give you healthy and indulgent options. Lastly, you can make this either on the stove or in the crock pot, so I’ll give you both options there, too. However, there is one area where you don’t have an option: you cannot make just a little bit of chili. You have to make a giant pot. But that’s a good problem to have because chili makes the best leftovers!

This one was hard to tag because you can make it as healthy as you want! As long as you have the basics, it's delicious.

This one was hard to tag because you can make it as healthy as you want! As long as you have the basics, it’s delicious.

What you’ll need:

Necessary ingredients:

  • 2 tablespoons olive oil
  • 1-1.25 pounds ground meat – use ground turkey for a healthier option, but I love the taste of ground beef.
  • 1 large onion, chopped
  • 4 teaspoons minced garlic – not necessary to have fresh garlic, but garlic in general is necessary. Use more garlic powder if you don’t use fresh garlic.
  • 1 tablespoon garlic powder – garlic powder is necessary, even if you use fresh garlic. If you don’t use fresh garlic, too, then triple the garlic powder.
  • 4 tablespoons cumin
  • 4 tablespoons chili powder
  • 3 bay leaves
  • 28 ounce can crushed tomatoes
  • 1 can or bottle of dark beer – ales, nut browns, stouts, or porters are the best. In a pinch, you can use a light beer, but stay away from IPAs.
  • 2 cans red kidney beans, rinsed

Optional ingredients:

  • Bell peppers, chopped – I like green because it adds color; I use 2 bell peppers
  • Cayenne pepper – adjust the amount to make it more or less spicy; I use 1/2 teaspoon
  • Celery, chopped – it adds a nice crunch to the chili, just use however much you have in the fridge
  • Carrots, chopped – it adds a little sweetness to the chili, again, use however much you have in the fridge
  • Bacon, crumbled – either turkey bacon or regular bacon is delicious, turkey bacon is healthier
  • Rice – it’s traditional in my family to serve chili over rice
  • Cheddar cheese – I love topping my chili with cheese!

What you’ll need to do:

Brown your meat in the two tablespoons olive oil over medium-high heat on the stove for about 5-7 minutes. If you’re going to use a crock pot, use a large pan. If you’re going to make the chili in a pot on the stove, just brown the meat in the pot. As the meat is browning, constantly break it apart with a wooden spoon. You want the meat to be smaller crumbles instead of large chunks.

Or, as an alternative, cook the bacon in the pan first. Cut or tear the bacon into smaller pieces and put them in the pan so that they cook faster and so you don’t have to crumble it later. If you’re cooking turkey bacon, cook the turkey bacon in the olive oil. If you’re cooking regular bacon, don’t put any oil in the pan. Then brown your meat in the same pan with the bacon drippings.

When the meat has browned, turn the heat down to medium and add the onion. If you’re using fresh garlic or bell peppers, add those at this time, too. Cook for about 3 minutes or until the onion has turned translucent. Add all your dry spices, except the bay leaves, and stir with the spoon until the spices thoroughly coat the meat and veggies.

I used turkey chili here, but the spices added the darker color.

I used turkey chili here, but the spices added the darker color.

If you’re cooking in a crock pot, transfer the meat and veggies into the crock pot. Add the can of crushed tomatoes, beer, and bay leaves, either in the crock pot or big pot on the stove. Stir to mix.

Cover and let cook for many hours. If you’re using the crock pot, set on low heat for at least 6 hours – you can let this cook all day if you’re making it on a work day. If you’re cooking on the stove, turn the heat to low and let simmer for at least 4 hours, stirring occasionally. The chili generally tastes better the longer you let it cook.

This will make your house smell wonderful all day!

This will make your house smell wonderful all day!

In the last hour of cooking, add your kidney beans. You can also add celery or carrots at this time if you’re using them. Stir and cover.

I love serving my chili over rice and topping it with cheddar cheese. In my family, we’ve also been known to put chili over tamales, but that may be a Southern California thing. Of course, chili is also delicious on hot dogs, fries, or other ballpark food. I’ve also heard of people putting chili over noodles. If you want to make it healthier, chili would also be good over quinoa. But you don’t have to pair it with anything at all – this chili is also delicious all by itself.

Enjoy!

Thanksgiving: The Turkey

When I first offered to host Thanksgiving, nothing intimidated me more than cooking the turkey. Potatoes and stuffing are easy and very forgiving with flavors and cooking time. And besides, turkey is the main event. But I’ve tasted way too many dry, overcooked turkeys in my life to think I could cook one easily.  How do I defrost the damn thing? How long do I cook it? What kind of seasonings do I use? Is it the stuffing that adds the flavor? (Remember, I don’t like stuffing in the turkey). How do I get the crispy outside and juicy inside? I was lost. I read recipe after recipe trying to figure out the trick to keeping it moist and tasty. And, I admit, I called the Butterball Hotline. My fears weren’t assuaged, but I figured there was nothing left for me to do but jump in and give it a shot.

I narrowed down my recipe collection to one basic, easy-looking recipe. I figured it was a good start and I could always add more or edit later if I needed to. By some stroke of luck, it was delicious. The turkey was crispy on the outside and juicy on the inside. And I have used the same turkey recipe without any changes or additions every year since.

The trick, I learned, is brining. Soaking the turkey overnight in a sugar-salt mixture makes the turkey super juicy, and I don’t really add much seasoning past that!

It turns out that cooking a delicious, juicy turkey is really easy. It takes a long time, but not a lot of attention. So if you’ve ever been too afraid to cook a turkey, fear no more. Give it a try and I promise you’ll find it’s a lot easier than you think.

Golden-brown, juicy, and delicious. There's never a reason to be scared of cooking a turkey again!

Golden-brown, juicy, and delicious. There’s never a reason to be scared of cooking a turkey again!

What you’ll need:
2 gallons water
2 cups salt
1 cup brown sugar
1 12-13 pound turkey
8 tablespoons butter
4 tablespoons garlic salt
4 tablespoons Italian seasoning
2 small onions
4 stalks celery

**Tip: You can scale the ingredients up or down based on the size of your turkey.

What you’ll need to do:

The night before Thanksgiving, start by cleaning and brining the turkey. Remove everything from the cavity (giblets, neck, and plastic bag) and discard. Place the turkey in the sink and thoroughly rinse the inside cavity and skin with cool water. This helps remove any bacteria within the cavity or on the skin.

In a very large pot, heat about 2 quarts of water, salt, and sugar over high heat. Stir until the salt and sugar dissolve. Add the remaining gallon and a half of water to help it cool faster. Cool to room temperature then submerge the turkey in the brine. This takes about an hour to prepare the brine, so don’t do it too late! Refrigerate overnight.

Be careful, that thing is heavy!

Be careful, that thing is heavy!

Remove the turkey from the brine. Pat the turkey dry and place in a roasting pan. Brush the turkey all over with melted butter, and season with garlic salt and Italian seasoning. Cut your two small onions in half and remove the skins. Cut the celery stalks into 4 pieces each. Stuff the turkey cavity with the onion halves and celery stalks for added taste and juiciness.

This guy is ready to go in the oven!

This guy is ready to go in the oven.

Put the turkey in the oven at 325 degrees. Here’s a timetable for roasting the turkey from the USDA:

  • 8 to 12 lbs: 2 3/4 to 3 hrs
  • 12 to 14 lbs: 3 to 3 3/4 hrs
  • 14 to 18 lbs: 3 3/4 to 4 1/4 hrs
  • 18 to 20 lbs: 4 1/4 to 4 1/2 hrs
  • 20 to 24 lbs: 4 1/2 to 5 hrs

Every hour or so, brush the turkey with more melted butter. This makes the skin nice and crispy. Cook to an internal temperature of 165 degrees.

**Tip: I can’t stress the importance of having a good meat thermometer. They’re not expensive, but they really help when cooking meat in the oven. They save you from having to cut open the meat to check doneness and letting the juices all run out!

After the turkey is done cooking, transfer to a cutting board and tent loosely with aluminum foil. Let it rest for about 30 minutes before carving.

Enjoy!

Turkeys don’t have to be cooked only for Thanksgiving. Try cooking one in the off-season. I already have a couple small turkeys in my freezer waiting for a good winter weekend.

Thanksgiving: The Gravy

If you read my Sourdough Bread Stuffing recipe, you know I’m not the biggest fan of cooking inside the bird. Sorry if I offend anyone, but it grosses me out. The same goes for gravy. I like other, non-inside-the-bird ingredients in my gravy, too. More than anything, I think it tastes better.

Plus, then you can make either the stuffing or the gravy even if you’re not making turkey. It is packed full of flavor from garlic, rosemary, thyme, and shallots without tasting like the inside of bird. This gravy would be delicious over chicken or potatoes, on a sandwich, or even over beef. Added bonus: it only takes about 10 minutes to make, so it’s easy to pop on the stove while you’re cooking everything else.

What you’ll need:

2 tablespoons olive oil
1 shallot, minced
4 teaspoons garlic, minced
1 sprig rosemary, minced (about 1 tablespoon)
1 sprig thyme leaves, minced (about 1 tablespoon)
1 bay leaf
1 teaspoon salt
3 tablespoons butter or margarine, melted
3 tablespoons flour
4 cups low-sodium chicken broth

**Tip: Fresh herbs are better, but you can raid your spice cabinet if you don’t want to make the trip to the market. If you use dried herbs, double the amounts.

What you’ll need to do:

Place a medium saucepan over medium-high heat and add your olive oil. Add the minced shallot, garlic, rosemary, thyme, and bay leaf. Cook until the shallot is tender, or about 3 minutes.

The smell of this is incredible. I can't imagine making gravy any other way!

The smell of this is incredible. I can’t imagine making gravy any other way!

While the shallot mixture cooks, make a paste with the butter and flour in a small bowl.

**Tip: The flour is going to be what thickens the gravy, and it’s really important to make this paste separately – do not add the flour straight into your gravy or you’ll get little lumps. Whenever you’re making a roux, always make a paste with the flour before your add it into your gravy or sauce.

Add the broth to the shallot mixture and scrape up any browned bits from the bottom of the pan with a wooden spoon. Bring to a boil, then whisk in the butter/flour mixture. Boil until sauce thickens to make a gravy, or about 5 minutes. Remove and discard the bay leaf.

Enjoy!

Cranberry Pear Sauce

Cranberry sauce out of a can is fine, but cranberry sauce made from fresh cranberries is phenomenal. Thanksgiving wouldn’t be Thanksgiving without cranberry sauce, and I encourage everyone to steer clear of the can. Making fresh cranberry sauce from scratch is so easy! It not only tastes better, but the texture is night and day different from the canned jelly kind and it only takes 15 minutes to make.

I love the pear in this cranberry sauce because the sweetness of the pear balances the tartness of the cranberry. I also added honey to sweeten it up a little more, but you could use Splenda or Truvia instead if you want to save some calories. Whatever you decide to do, I promise you’ll want to make this more often than late November.

Sweet, tart, and totally delicious. I could eat this year-round.

Sweet, tart, and totally delicious. I could eat this year-round.

What you’ll need:
12 ounces fresh cranberries
2 ripe pears, cubed
1/2 cup honey
1 cup water

What you’ll need to do:

Bring all the ingredients to a boil in a medium pot. After the mixture reaches a boil, reduce the heat and simmer until the cranberries burst and the sauce thickens, or for about 15 minutes. Stir occasionally.

Remove from heat and let it cool before refrigerating. The sauce will thicken as it cools. Serve chilled or at room temperature.

It’s that easy! Enjoy!

Skinny Scalloped Potato Gratin

White potatoes don’t have to be super sinful, and Thanksgiving is bad enough with all the other starches and sweets. So this year I wanted to take a healthy twist on the traditional Thanksgiving mashed potatoes. And since I was already making a version of mashed sweet potatoes, I wanted to change it up with scalloped potatoes. I found this healthy recipe on another cooking blog I follow, and it looked so tasty I had to try it.

Potatoes are my ultimate comfort food, and these are dripping with gooey sharp cheddar cheese and spiced with fresh thyme. You would never guess that it’s on the lighter side of the menu! This potato dish is sure to become a Thanksgiving staple in my family.

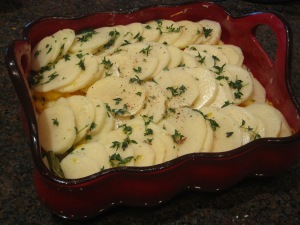
Yes, it is as delicious as it looks.

Yes, it is as delicious as it looks.

What you’ll need:

6 medium yukon gold potatoes
2 tablespoons melted butter
1/2 teaspoon garlic powder
Salt and pepper to taste
1 cup shredded reduced fat sharp cheddar cheese
1 cup fat free milk
1 bay leaf
pinch nutmeg
2 teaspoons fresh thyme

What you’ll need to do:

Preheat oven to 425 degrees. Spray an 11×7″ baking dish with cooking spray.

Peel your potatoes, then slice them as thinly as you can get them – aim for 1/8 inch thick.

In a large bowl, combine potatoes, butter, garlic powder, salt, and pepper.

Use a large sharp knife to cut the potatoes. If you have a good mandolin, you can use that instead to make thin slices.

Use a large sharp knife to cut the potatoes. If you have a good mandolin, you can use that instead to make thin slices.

Arrange half of the potato slices in the baking dish, then top with 1/3 cup cheese. Add the remaining potatoes.

In a small saucepan, bring milk, thyme, bay leaf, and nutmeg to a boil. Pour over potatoes. Top the potatoes with the remaining cheese and bake uncovered for about 45 minutes or until potatoes are tender.

Potatoes drenched in milk mixture before I added the cheese.

Potatoes drenched in milk mixture before I added the cheese.

Enjoy!

Parmesan-Sage Pork Loin with Oven Roasted Veggies

The colder it gets in the Midwest, the more I crave a hearty meal. I knew this would be the perfect winter meal with the first bite I took – I was instantly transported back to the cabin in the mountains my family used to visit when I was a kid. Sage is such a warm-tasting flavor, especially when it’s rubbed over a juicy pork tenderloin resting on a bed potatoes, carrots, onions, and celery. It’s a delicious one-dish meal perfect for winter hibernation.

While chicken is my usual go-to protein, pork is a great, inexpensive substitute for when you want to mix things up.

What you’ll need (makes 4 servings):
2 cups diced red potatoes, unpeeled
1 cup chopped onion
1 cup chopped celery
1 cup chopped carrots
1 1/2 cup reduced-sodium chicken broth
1/2 cup sherry
1 2lb. pork tenderloin
2 tbsp. dried sage
1 tbsp. dry garlic
1 tbsp. dry basil
1 tbsp. dry oregano
Salt and pepper to taste
1/4 cup Parmesan cheese

What you’ll need to do:

Preheat your oven to 400 degrees.

Chop all your veggies, and then arrange them in a large roasting pan (if you don’t have one, like me, use a 9×13″ pan). Pour the chicken broth and sherry over the veggies and mix with your hands.

Rub the pork all over with the sage, garlic, basil, oregano, and salt and pepper. Place the pork on top of the veggies and sprinkle with Parmesan.

I sprinkle a little bit of the herbs over the veggies, too!

Roast until a meat thermometer registers 160 degrees Fahrenheit when inserted into the thickest part of the tenderloin. My roast took about an hour.

Let the roast rest for about 10 minutes – cover with aluminum foil to keep warm while roasting. Then cut crosswise into 1/2-inch-thick slices and serve with the veggies and brothy sauce.

The delicious smell that fills your house while this cooks is intoxicating.

Enjoy!

Crock Pot Corn and Cheese Chowder

It’s soup season! Which also means it’s time to break out the Crock Pot. I love cooking in the Crock Pot because it’s so easy. Spend a little time in the morning prepping a few ingredients, and by the time you get home from work you have a delicious dinner and leftovers for lunch tomorrow.

I like this dish in particular because it tastes indulgent but it’s still fairly healthy. I love chowders and cream-of-whatever-soups, but they’re often not figure-friendly. In this dish, I swapped out some of the less healthy options for healthier ones (did you know they made reduced fat evaporated milk?!). I kept the potatoes because a chowder has to have potatoes, but you’re really not eating too much of them with the amount of servings this makes. Just serve this creamy soup with a tossed green salad and crusty French bread for a complete, delicious family meal.

Creamy, sweet, with spice from the cumin makes this a delicious cold weather meal.

What you’ll need (makes 6 servings):
1 large onion, finely chopped
1 tbsp. minced garlic
1 tbsp. olive oil
2 tsp. cumin
3 cups reduced-sodium chicken broth
2 medium potatoes, peeled and chopped into small, bite-sized pieces
1 can creamed corn
2 cups fresh or frozen corn kernels (I used frozen and threw them in un-thawed)
1/4 cup fresh Italian parsley, chopped (dry works fine, too)
1 cup reduced fat sharp shredded cheddar cheese
1 can reduced fat evaporated milk
2 tbsp. fresh chives, chopped (you need fresh here; green onions will work, too)

What you’ll need to do:

In a medium skillet over medium-high heat, sauté the onion and garlic in the oil until golden.

There’s the golden color we’re looking for. That’s when the onions and garlic lose their bite and become sweet.

While the garlic and onion cooks, peel and chop your potatoes. Throw them into the crock pot as you go.

Add the can of creamed corn, frozen (or fresh) corn, parsley, and cumin. Add the onion and garlic when it’s done cooking. Pour the chicken broth over the top and mix thoroughly.

I love the cumin in this dish. It gives the dish an unexpected warmth.

Cover. Cook on low for 8-9 hours or until the potatoes are tender. In the last hour of cooking, add the cheese and evaporated milk. Garnish with chives before serving.

Enjoy!

If you like this dish, check out my Turkey Bacon and Lentil Soup.

Let’s Talk Steak

Steak is a treat food for me. I don’t eat it all that often because it’s a little pricier than my go-to chicken and it’s not as healthy to eat all the time. But if you do it right, steak can be budget-friendly and good for you. Plus, I think it’s even easier to cook than chicken. Steak is a lot more forgiving because you can cook it to your liking, whereas you can only cook chicken until it’s done (no rare or even medium-rare chicken, please). So before I get into a simple steak recipe, I want to share some basic tips for cooking steak.

Steak is a delicious, easy treat.

Have you ever heard of the hand test to check if the steak is done? No? Well no more cutting the steak open to see if it’s cooked! And no meat thermometers either. Cutting the steak open or poking a hole with a meat thermometer lets the juices run out and makes the meat dry (not to mention it’s not super pretty either). Instead, all you need is the palm of your hand to check if your steak is rare, medium rare, medium, or well done. Simply press on the meat and compare to the pad of your hand as is shown below:

Raw: Open the palm of your hand. Relax the hand. Take the index finger of your other hand and push on the fleshy area between the thumb and the base of the palm. Make sure your hand is relaxed. This is what raw meat feels like.

Rare: Press the tip of your index finger to the tip of your thumb. The fleshy area below the thumb should give quite a bit. This is what meat cooked to rare feels like. Open up your palm again and compare raw to rare.

Medium rare: Gently press the tip of your middle finger to the tip of your thumb. This is medium rare. Press on the steak and see if it feels similar – this is my favorite doneness.

Medium: Press the tip of your ring finger and your thumb together. This is what meat cooked to a medium doneness feels like.

Well Done: Now gently press the tip of your pinky and your thumb together. Again feel the fleshy area below the thumb. It should feel quite firm. This is what well done meat feels like when you press on it.

Got it? It’s pretty simple really, and it’s amazing how accurate that test is. Just remember that the meat continues to cook for a little bit after you take it off the stove or grill.

Next tip: Always let the meat rest so it can reabsorb the juices. Don’t you hate when you cut into a steak and the juices run all over your plate and into your potatoes? Instead, let the steak rest for 10 minutes before cutting into it. Cover it with aluminum foil to keep it warm.

Last tip: When buying steak, I generally gravitate towards less marbling (less fat). More marbling may mean more flavor but I think it makes the meat tough and chewy, not to mention much less healthy for you. If you get a cut with the fat around the outside instead of throughout, then you can cook the steak with the fat on for the flavor and then just cut it out when you eat it. Also, you don’t have to buy filet mignon to have a good steak. You can get decent cuts of meat for a decent price if it’s just any regular weekday night. Save the splurge cuts (like filet mignon) for special occasions.

Ready for a super simple steak recipe? Here goes…

What you’ll need:
2 steaks, any cut
1 teaspoon steak seasoning

What you’ll need to do:

Place a grill pan over medium-high heat and spray with cooking spray. Get your pan really hot before you put your steaks in – searing the meat will lock in the flavor and juices. Season both sides of the meat with the steak seasoning (if you don’t have steak seasoning, just use some salt and pepper). Cook the steak for about 5 minutes on each side using the hand test to check doneness. Serve with your favorite side dishes and enjoy!

Healthy Bacon Mac ‘n Cheese

A good friend (and regular reader) recently challenged me to make a healthy version of mac ‘n cheese. Since this good friend was also my college roommate, I know how much she loves this delectable comfort food. I admit, it’s one of my guilty pleasures, too. I love the rich, gooey, creaminess of mac ‘n cheese. One of my favorite tricks is throwing in some smokey, crispy bacon (yum!). However, since neither of us have the metabolism of an 18-year-old anymore, we can’t eat mac ‘n cheese nearly as often as we’d like and still fit into our jeans. So, challenge accepted.

Keep in mind, I don’t think there’s anything that can truly replace the fake, bright orange Kraft mac ‘n cheese with whole milk and real butter. But this dish gets pretty darn close. I swapped out the milk, butter, and cheese with low fat cheese and Greek yogurt. I love the Greek yogurt because it adds in that creaminess that you might be missing, plus it’s loaded with protein for added health benefits. I also added in some onion and garlic to add taste and fill you up on virtually-no-calorie veggies. I also used turkey bacon instead of real bacon, and I used whole wheat pasta instead of white pasta. While it’s not the healthiest dish in the world, it’s certainly a great substitute for the much-less-waistline-friendly version. Plus, it only took about 20 minutes to make and it makes great leftovers!

Make this dish the next time you have a comfort food craving.

What you’ll need:
1 box (about 13.5 ounces) whole wheat elbow pasta
1 medium yellow onion
9 tbsp minced garlic (yes that much)
1 tbsp olive oil
1 tbsp dry mustard
1 cup low fat sharp cheddar cheese
1/3 cup low fat plain Greek yogurt
1/2 cup Parmesan cheese
4 strips turkey bacon (but feel free to add more!)

What you’ll need to do:

Preheat your oven to 425 degrees. Spray a 9×13 inch baking dish with cooking spray. Set aside.

Bring a large pot of water to a boil. Add the macaroni and cook according to package directions. Drain when it’s done, and then add it back to the pot.

Whole wheat pasta keeps you satisfied longer.

While the pasta cooks, chop your onion as finely as you can. Set a medium-sized pot over medium heat and coat with the olive oil. Add your chopped onion, minced garlic, and dry mustard. Stir often and cook until the onion is transparent (this should take just a couple minutes).

Chop those veggies very finely so they mix in with the cheese sauce. Honestly, you barely notice they’re in there. The onions and garlic are slightly sweet and add tons of flavor.

After the onion-garlic mixture is done, add the cheddar cheese and stir until melted. Turn off the heat, then add the Greek yogurt and stir.

Creamy, gooey, and delicious. It’s not that same fake bright orange, but it’s very tasty!

Add the cheese sauce to the cooked macaroni noodles and stir until combined. Add to the 9×13 inch baking dish, and then sprinkle the Parmesan cheese on top. Bake for about 10 minutes, or until the Parmesan is melted and the macaroni is hot throughout.

You could certainly eat this as-is, but let’s top this with a little turkey bacon…

While your mac ‘n cheese bakes, put a pan over medium-high heat on the stove to cook your turkey bacon. Spray the pan with cooking spray, and cook the turkey bacon for 5 minutes on each side. Your turkey bacon should be done at about the same time as the baked mac ‘n cheese. The reason I cook the turkey bacon separately and add it to the dish at the end is so that it stays crispy.

Lastly, tear the turkey bacon into small pieces and sprinkle over the mac ‘n cheese.

The bacon adds some smokey, crispy, saltiness that puts this dish over the edge. You’ll hardly notice it’s healthy!

Scoop into a bowl and enjoy!