Turkey Bacon and Lentil Soup

The best part about soup is that you always end up with leftovers. So, dinner? Done. Lunch tomorrow and the next day? Done and done. And you end up getting an extra 7 minutes of sleep in the morning because you don’t have to make a sandwich. Oh, and did I mention that soup can be really yummy, easy, healthy, and inexpensive too? This recipe is a quintuple whammy!

Yummy, easy, healthy, inexpensive, and makes leftovers? I'm in!

Let’s start with yummy. The turkey bacon is rich and smokey; the onions and garlic add a big kick of flavor; and the lentils, carrots, and celery make this super hearty. The smell that permeates the house when you cook this makes your mouth water, and you can’t help but eat cup after cup of this dish.

Okay now easy. This one’s another crock pot wonder. So after the 15 minutes it takes to chop all your veggies and throw them into your crock pot, you just set it and forget it in the morning, go to work, and come home to an already cooked meal.

This dish is as healthy as it is yummy. It makes about 6 servings, and it’s only about 194 calories per serving. But you’d never guess it. Guilt-free seconds, please!

It’s always great when a dish is inexpensive, too. Carrots and celery are about 99 cents each (and you have leftovers for a bomb salad or snacks later). A pound of dry lentils is about $1.30, and the leftovers keep in your cupboard until you want to make this again. One onion is about 45 cents. A couple cans of chicken broth are about a dollar each. And a package of turkey bacon is about $4, conservatively. So the entire meal is less than $10! And you’ve made two lunches and have some leftover veggies for later. Not bad, right? Okay let’s get down to business…

What you’ll need:
1 medium onion
2 medium carrots
2 ribs of celery
3 cloves of garlic (or 3 teaspoons of chopped garlic from your kitchen staples)
1 1/2 cups dry lentils
12 ounce package of turkey bacon
6 cups low sodium chicken broth

What you’ll need to do:

Chop your onion, carrots, and celery and throw them right into your crock pot.

Keep your vegges about the same size so they all cook evenly.

Add your garlic and lentils. Then slice your turkey bacon into bite-sized slices and add to the pot.

Your turkey bacon should be about the same size as your veggies. Just slice across the whole package and then break apart with your fingers.

Lastly, add your chicken broth and stir.

Just stir and you're ready to go!

Cook for 9-11 hours on low heat (or however long it takes you to get home from work).

I made this on a cold, rainy Saturday and could barely stand it while I smelled it cooking all day.

And you’re done! This dish is really delicious with sourdough bread (perhaps leftover from your pulled pork sandwiches!).

Chicken, Pesto, and Spinach Quinoa

There’s this lunch place by my office that boasts really healthy, high protein lunches and it has this amazing chicken, pesto, and spinach quinoa. Whenever I go there for lunch, I always end up getting it even though there are other yummy looking items on the menu. I mean, chicken, pesto, and spinach? I’m in. And I love quinoa because of how versatile and healthy it is (see my latest post on quick and easy quinoa). So I really wanted to see if I could replicate this dish at home to satisfy the constant cravings I have for it.

This dish is so rich because of the pesto, creamy and nutty with melted Parmesan, with a little crunch from the quinoa. This dish tastes so naughty, but it’s so incredibly healthy! It’s really high in protein (about 35 grams) and really low in calories (about 371 per serving). And because it’s so high in protein, it’s really filling. I promise, my chicken, pesto, and spinach quinoa will fix any comfort food craving.

There's nothing better than curling up with a bowl of this chicken, pesto, and spinach quinoa and enjoying a movie on a colder Spring night.

What you’ll need (makes 4 servings):
1 cup quinoa
2 chicken breasts
3 big handfuls of fresh spinach (about 3 cups)
6 tablespoons pesto
1/2 cup Parmesan cheese

What you’ll need to do:

First, get your quinoa cooking on the stove – all you do for this is make basic “Quick and Easy Quinoa.” So, put your quinoa in a pot with 2 cups of water (remember, the ratio is 1 to 2, quinoa to water). Put uncovered over high heat on your stove and watch it until it boils. As soon as it boils, turn the heat down to low and cover. Since you have about a cup of quinoa this time, it takes about 15 minutes to cook.

You'll know your quinoa is done when you see those little tendrils emerge.

While your quinoa is cooking, make sure your chicken breasts are defrosted and chopped into small bite-sized pieces. I chop it before I cook them because it more evenly cooks the chicken and it takes way less time. As soon as your chicken is chopped, throw it into a large pan sprayed with cooking spray over medium-high heat. Use a spatula to turn your chicken and make sure all sides are cooked – the chicken only takes a few minutes to cook. If your chicken is done before your quinoa, just set it over low heat to keep it warm.

When it's cut into those little bite-sized pieces, the chicken takes only a few minutes to cook.

After your quinoa is done, add your pesto and stir (any kind of store-bought pesto will do). Then, add your Parmesan cheese and stir – by adding the Parmesan to the warm quinoa it gets nice and ooey, gooey, and melted, and also acts as a binding agent in your dish. Lastly, tear your spinach into more bite-sized pieces as you throw it into the mixture (you could also probably use cooked, frozen spinach if you have it in your freezer). After these three ingredients are combined, add your chicken and stir.

Yum, yum, yum. I can barely avoid taste-testing this one as I cook!

That’s it! It’s a pretty easy, healthy dish that cures your craving for comfort food.

2 Ingredient, 3 Step, Slow Cooker Pulled Pork

There’s nothing better than coming home from work and smelling a delicious, home-cooked meal waiting for you. And with my pulled pork recipe, having that delicious, home-cooked meal waiting for you has never been simpler. It has 2 ingredients and only takes about 5 minutes of actual prep time. Not to mention, it’s super delicious – but, seriously, when is pulled pork not? So whenever Clinton requests this recipe (and trust me, he requests it a lot), I am always happy to oblige.

So delicious. So easy. You really can't go wrong with this dish.

What you’ll need:

2.25-2.5 pound pork tenderloin
1 20 ounce bottle of your favorite BBQ sauce

What you’ll need to do:

Step 1: Put your pulled pork in your slow cooker and smother with the entire bottle of BBQ sauce.

There's my pulled pork, chillin' in my favorite BBQ sauce.

Step 2: Cook on low for about 10 hours (anywhere between 9-11 hours is fine; mine differs depending on when I get off work).

As soon as I open the door to my apartment when I get home from work, I am overwhelmed with how amazing this smells. I can barely get off my shoes and jacket before I'm sampling this yummy goodness.

Step 3: Once cooked, use two forks to pull the pork apart and shred. Make sure that you do this in the BBQ sauce – the first time I made this recipe I made the mistake of removing the pork and shredding it outside of the BBQ sauce, and you definitely don’t want to do that. All that pulled pork and BBQ sauce needs to be combined for optimal yumminess.

The pork tears really easily, just make sure that you're mixing it in with the BBQ sauce as you do it.

And enjoy! Seriously, it’s as simple as that.

I like to serve this as sandwiches (also simple). I love it on sourdough bread, toasted with a little sharp cheddar cheese. Sometimes I’ll throw sliced apples on the sandwich (try it, it’s delicious!). If you use a lower calorie and/or sugar BBQ sauce, this dish can also be quite healthy.

Another big bonus: it makes a lot of leftovers that are great for easy lunches or nights when you don’t want to make dinner. Pulled pork freezes really well, too!

Zesty Salad Dressing and a Salad Veggie How-To

This is definitely going to be more of my more “how-to,” “knowledge-packed” posts, so brace yourselves. But I promise it takes longer to say the title of this blog post than it does to make the salad and the dressing.

Clinton and I love salads. They’re so light and crisp and refreshing that for us, healthy is just a nice benefit. And I love having a nice, bright salad as a side dish to a simple chicken dinner, especially with summer right around the corner. Salads are such a simple addition to a potluck, BBQ by the pool, or picnic in the park. So the goal of this post is to take you step-by-step through what I like to buy for my perfect side salad, how I pick out my veggies, how to chop them, and how to make a super easy, homemade dressing.

While it looks like there are a lot of steps to this salad, it's really quite quick and simple. Not to mention, all that chopping is quite the stress-reliever!

What you’ll need:

For the salad (and how to pick it your veggies at the market):

  • Head of iceberg lettuce
    • Choose a head of lettuce that’s less rust-colored on the bottom. Also, choose one that’s the most tightly bound – that’s how you know it’s the freshest.
  • 2 bell peppers – I usually do 1 red and 1 orange for color
    • Choose the bell peppers with skins that look the waxiest.
  • 4 carrots
    • Carrots are carrots. Just choose ones that look good without blemishes.
  • 6 or so stalks of celery
    • Like the lettuce, choose celery that’s the most tightly bound and without blemishes.
  • 1 medium jicama
    • What’s jicama, you ask? It’s one of my favorite additions to salad ever. It’s just like watercress, but a little bit sweet. They kind of look like a really round, hairy potato or a less-hairy coconut. To pick out a good one, just find out with the most uniform skin without blemishes or bruises.
  • 2-4 Roma tomatoes
    • Choose tomatoes that are a rich red color and without blemishes. I find that a lighter red color means they’re less flavorful.
  • 1-2 cucumbers
    • Choose cucumbers that are dark green and firm when you squeeze them.
  • 4 or so green onions
    • Choose green onions that stand straight and don’t look wilted.

All my perfect veggies, ready to go. That round, beige-looking thing next to the lettuce? That's jicama. You'll usually find it near the Asian veggies.

For the salad dressing:

What you’ll need to do:

For a salad, I always start by making the salad dressing because it gives the flavors some time to marry. In whatever container is good for salad dressing, start by combining your zesty Italian salad dressing mix, lemon juice, and sherry. Shake or stir, and then set it aside until you’re done chopping all your veggies.
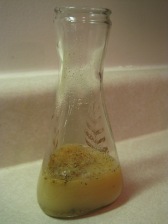
I have a pretty nifty salad dressing container that Clinton's mom gave me. If you have a container with a lid (like mine), just shake to mix. I leave the mix, lemon, and sherry in there for awhile so that the flavors can marry while I chop my veggies.

Next, have your veggies all out and ready to go with a good knife, cutting board, salad bowl standing by so you can throw your veggies in as you chop them, and your trash can sitting next to you. That’s right, have your trash can right next to you when you do this. In fact, I always have my trash can right at my feet whenever I cook so that I can toss tidbits right in as I go so I don’t have a big pile of garbage on my kitchen counter and in my way.

First, make sure you wash all your veggies that aren’t going to be peeled. Now on to chopping. I try to get rid of some of the bigger veggies first so that I can have more space on my counter as I chop. This is purely by choice, there’s no real order you need to chop the veggies.

Let’s start with the lettuce. Some people say it’s taboo to cut your lettuce with a knife or it’ll get that rust-colored look where you cut it. I find that it takes way too long to tear a head of lettuce by hand, and I almost never find that it gets rust-colored around the edges when I cut it with a knife. So I start by cutting the head of lettuce in half, and then cutting out the core by cutting diagonally into the head (throw the core right into the trash can next to you). Cut the rest of the lettuce in rough chops so you have big pieces.
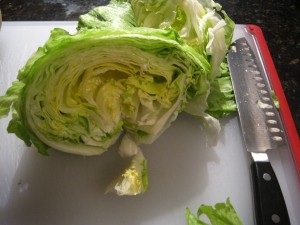
You can see how I take out just the core of the head of lettuce by cutting diagonally into it. This saves as much of the lettuce as possible for my salad.

For your bell peppers, cut them in half and then use your hands to tear out the big bunch of seeds and stem towards the top of the pepper. Then, because I often find it’s easier, cut the bell pepper into quarters so that you can use your knife to cut out the ribs. Make sure you get rid of all the seeds and ribs of the bell pepper – they don’t taste so great. Then slice into big chunks.
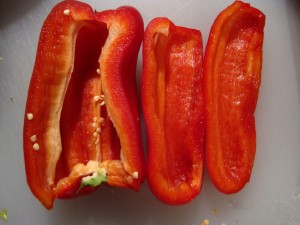
It's easier to cut this by putting the outside part down on the cutting board (as shown) and slicing your bell peppers this way. One the half you see quartered, you can see I sliced out the ribs and seeds. Even though I used my hands to tear out the big bulk of seeds from the other half, you can still see the ribs I need to cut out.

Your tomatoes will be chopped similarly to your lettuce, actually. Cut them in half, and then use your knife to diagonally cut out the very top of the tomato – this preserves the most amount of yummy tomato meat possible. Then, chop into big pieces. I typically like to take out the seeds of the tomato because they make the salad runny (but instead of throwing them in the trash can, I pop them into my mouth as a treat!).

Like the lettuce, you can see how I cut diagonally into the tomato to save as much of the meat as possible.

Celery is super easy. Chop off the ends of the celery, and then chop into nice big chunks. I love the crunch of celery in a salad!

Your green onions are the last veggie you can chop without peeling. Make sure to cut off the ends, and then chop into smaller pieces since onions are a lot stronger tasting than many of your other veggies.

Peeling veggies isn’t my favorite, but for this salad it’s totally worth it. I start with my cucumbers because they’re super easy and because I don’t have to wash my peeler before I move onto my other veggies (jicama, on the other hand, can get messy). Completely peel your cucumbers, then cut in half lengthwise so you have a nice flat surface to work with. Then, flat-side down, cut off the ends of the cucumbers, and then slice in medium slices.
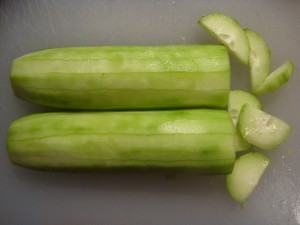
I put them flat-side down on my cutting board and then slice right through the rest of the cucumber. I like leaving the cucumbers in these bigger slices so you can really taste big bursts of them in your salad.

Now onto your carrots. Completely peel these, and then cut off the end that used to have the stem. Depending on how big your carrots are width-wise, you may want to cut them in half lengthwise like your cucumbers. But if they’re smaller, go ahead and chop in medium slices.

Lastly, onto the jicama. Now as good as jicama tastes, it’s quite the pain in the butt to peel – but so worth it. I start by cutting my jicama in half before I peel. This allows me to have a nice edge to work my peeler from because it’s definitely hard to get started. Make sure you get off all the jicama skin because it’s very hairy and not very good tasting. After it’s completely peeled, I chop it very similarly to how I chop an onion. Start by putting it flat-side down on your cutting board, and then slicing across the jicama vertically. Stack your jicama so that you can slice it again horizontally, making medium-sized chunks of jicama.

Here you can see it totally peeled and flat-side down on my cutting board. I slice all the way through the jicama (starting as shown), and then stack my slices and cut horizontally to make medium-sized chunks. Snack on a few of these pieces as you chop - it's so yummy!

By now, all your chopped veggies should be in your bowl and ready to go. Remember that salad dressing we made and set aside? Add the oil and then shake or stir. Toss with the salad, mixing up the dressing and the veggies. And you’re done!

While I normally throw my veggies in my salad bowl as I chop them, I laid them all out here so you can see what the finished product looks like. I generally like to chop my veggies in larger chunks so you get big bursts of flavor when you take a forkful.

It seems like a lot of work, but I promise it’s not. Once you get going with the chopping, it takes about as long to make this salad as it does to make a standard chicken dish (I recently made this with my Chinese BBQ chicken). And because it’s easier to make a salad like this in a large batch, you’ll have yummy, healthy, fresh leftovers all week that are a great compliment to any other dinner or are an easy lunch to bring to work. This salad is definitely a favorite in my house!

Chinese BBQ Chicken

Calling this dish Chinese BBQ chicken is slightly deceiving. It sounds way more fancy than this dish actually is. But it tastes so yummy that nobody will ever guess how simple it is. Basically, you use three ingredients: frozen chicken tenders, lemon juice, and hoisin sauce (I also throw in green onions if I have them in the fridge). That’s it!

What’s hoisin sauce, you ask? Well that’s where the Chinese BBQ component comes in, because hoisin sauce is basically Chinese BBQ sauce. As soon as you smell it, you’ll instantly recognize what it is because it’s a key ingredient in a lot of Chinese food dishes. It’s a sweet, a little vinegary, with a hint of garlic and chili peppers. The simple addition of this one ingredient to a couple kitchen staples you already have will really shake up your weeknight repertoire. It’s my epitome of an easy, healthy weeknight meal.

Hoisin sauce will keep in your cupboard for a long time, so it's definitely a good investment ingredient to have on hand.

What you’ll need:
4-5 frozen chicken tenders
2 tablespoons hoisin sauce
2 tablespoons lemon juice
3 green onions, chopped (optional, if you have them)

What you’ll need to do:

Start by heating your large pan on the stove over medium heat and spray with cooking spray. You’re going to cook the chicken exactly the same way you do in “let’s talk chicken,” so get that chicken in your pan and cover with aluminum foil.

After about 8 minutes, check your chicken – the chicken should start to look white around the edges and still pink in the middle. That’s how you know it’s ready to turn. Recover and cook for another 8 minutes.

Here's the chicken, white on the outside and pink on the inside. It's ready to flip.

Once the chicken is done, add your 2 tablespoons of hoisin sauce right on top. Throw on your green onions, and then pour in your lemon juice.

The beauty of this meal is that it's a simple twist on your basic chicken. You still mostly use kitchen staples.

Turn your chicken in the pan to cover with the sauce. Let it cook for another minute just to heat up the hoisin and cook down some of that lemon juice. And your super easy Chinese BBQ chicken is done!

It’s healthy, tasty, and I seriously can’t stress how simple this is. If you put rice in your rice cooker and a steamable bag of veggies in the microwave before you start, you have a delicious and healthy meal after a long day at work when all you want to do is crash on the couch. Not to mention, it’ll cure any craving for the much-less-healthy Chinese take out, too 🙂

Enjoy!

Spring Peas with Dates and Walnuts

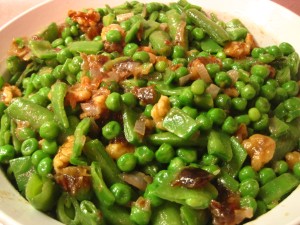
First, can I just say “Yum?!” This is super delicious, surprisingly healthy, and a constant special occasion request of Clinton’s. I made this most recently for Easter, but it’d be great for any holiday meal or any time you want to really wow a dinner party. The three different types of peas have such a fresh pop of flavor, the dates add a bit of sweetness, and a hint of cayenne pepper adds a bit of a kick that takes this side to the next level.

This super tasty, surprisingly healthy side dish is always a crowd pleaser.

What you’ll need:
10 ounce bag of frozen peas, thawed
1 pound sugar snap peas, trimmed
1/2 pound snow peas, trimmed and thinly sliced
2 tablespoons olive oil
1 large shallot, diced
1/4 cup chopped walnuts
1/4 cup chopped dates (fresh or dried work fine)
Pinch of cayenne pepper

What you’ll need to do:

The most important part of making this dish happen is the prep. Since there’s a lot of moving parts once you get going, having everything thawed, trimmed, and chopped before you begin will make the whole process go a lot more smoothly. Just make sure that as you prep each ingredient, you keep everything segregated because they each go in at different times in the process.

Start by thawing your peas. If it’s a steamable bag of frozen peas (like the kind I’m so fond of), cook slightly less than the package recommends. Or, just leave them in the refrigerator all day. You don’t want them to be too cooked, but you don’t want them to be frozen either.

Then get to work on trimming your peas. For both the sugar snap peas and the snow peas, cut off both ends of the peas (just a little bit!). Set the sugar snap peas aside, and then slice the snow peas very thinly. You can either go horizontally or vertically across the peas – I thick slicing vertically is prettier.

This is bout how much you want to take off the ends of your sugar snap peas.

Lastly, dice your shallot into medium-fine pieces. Chop your walnuts (or buy them already chopped) and chop your dates.

Now it’s time to cook. Simultaneously, get a large pan with 1 tablespoon of olive oil heating over medium heat, a medium pot of salted water boiling on your stove, and a large bowl of ice water ready on your counter. After your pan is heated and your water is boiling, we’re going to get both shallot cooking in the pan and the peas cooking in the pot all at the same time. This is why it’s so important to prep first!

Starting with the shallot, throw the shallot in your pan and cook until soft (about 2 minutes). Add the walnuts, dates, and cayenne pepper and cook until the walnuts are toasted (about 1 more minute). After this is done, turn off the heat. Because you’re doing everything simultaneously, the peas will be done and it’s time to add them to the pan.

The amount of flavor in the combination is out of this world. It feels so luxurious and indulgent without adding a ton of fat, sugar, or carbs like you'd find in a typical holiday side.

Now about those peas… While your shallot is cooking, your water should be boiling. Add the snap peas and cook until green (about 2 minutes, or right after you add the walnuts, dates, and cayenne pepper to your pan). Then, add your snow peas for about 30 seconds. Immediately turn off the heat, drain your peas, and plunge them into your bowl of ice water. This shocks the peas and helps them keep their green color and crispy texture. After they’ve cooled, drain.

Your shallot, walnut, date, and cayenne mixture should be coming a finish at about the same time as your peas (remember, those thawed peas have been sitting there ready to go, so we really haven’t had anything to do with them yet). If your timing is a little off, no big deal at all. This isn’t supposed to be a hot dish, so your shallot, walnut, date, and cayenne mixture can sit in the pan (with the heat off) for as long as you need to catch up. In any case, when both mixture are ready, add all your peas (including the thawed peas) to the large pan with the shallot, walnuts, dates, and cayenne. Add the last tablespoon of olive oil and mix together.

Serve slightly warm from the pan or at room temperature. And while this dish requires a bit of a balancing act, it only takes about 30 minutes to make. Yum, yum, yum…

Quick and Easy Quinoa

Getting back to basics, quinoa is one of the best staples to have in your kitchen. Quinoa (pronounced KEEN-wah) is a super healthy, protein-packed, high-fiber grain that’s a perfect compliment to any weeknight meal (you’ve seen it pictured with my bacon, blue cheese, and spinach stuffed chicken). Added bonus: it’s gluten-free for those who have difficulty with other grains. Basically, it’s an even healthier alternative to rice because it has more protein, more fiber, and less carbs – and by healthier, I don’t mean less tasty.

This super-powered side dish is so healthy, so easy, and so awesome that it made my kitchen staples list.

The first time I had quinoa was a few years ago. My parents came home from Costco with this mystery grain. Odd, I thought, but I’m not picky so I tried it. Surprisingly, it wasn’t bad. And that was before we even put anything in it (my mom had cooked it plain with just water like we’re used to dong with rice). After finding out how incredibly healthy this grain is, I’ve played with different ways of cooking it and come up with some pretty yummy ideas while keeping it super nutritious.

So, rather than a traditional recipe this time, I’m going to share some ideas. For the basic starter of any quinoa…

What you’ll need:

1 part quinoa
2 parts water

What you’ll need to do:

Put your water and quinoa together in a pot on the stove starting at room temperature. Set the heat over high, and watch until your water boils rapidly. As soon as your water boils, immediately turn the heat down to low and cover your pot. After about 10 minutes, you should see little tendrils spiraling away from your quinoa – that’s how you know it’s done (see the top picture for a close up). It’s as simple as that!

I make this one on the stove because I like to keep an eye on those tendrils. But it's so easy that you can do it right next to your grill pan when you're making some yummy chicken or fish.

Okay now for some fun ideas. Quinoa by itself is okay tasting, but it honestly doesn’t knock anything out of the park. To add some fun flavor without sacrificing nutrition, here are some ideas:

  1. Add a couple tablespoons of lemon juice and lemon pepper! This adds a citrus flavor that brightens up your grain and pairs perfectly with fish or your healthy, yummy chicken piccata. Besides, these are in your kitchen staples anyway.
  2. Add a couple tablespoons of light balsamic vinaigrette. Seriously, it’s hard to guess that the balsamic vinaigrette is even in there, but it really elevates the flavor of an otherwise-slightly-boring side dish. This is what I paired with my bacon, blue cheese, and spinach stuffed chicken.
  3. Add a couple tablespoons of soy sauce. Again, it’s in your kitchen staples anyway, and it’s a great addition to pair with your mango chicken.

No matter what you put in it, quinoa is a perfect side dish when you’re looking for something super healthy and super easy. And if you shop at Costco, it’s pretty inexpensive (seriously, Costco is the best)! Better yet, quinoa is not only great as a side dish, but it’s also a fantastic high-protein addition to a salad. But more where that’s coming from another time 🙂

Pictured here with my bacon, blue cheese, and spinach stuffed chicken. Yum, yum, yum....

Enjoy!

Hard Boiled Deviled Chicks, and Everything Inbetween

Deviled eggs are a fun appetizer any time of the year, but they’re especially appropriate around Easter. This year, I cutesied  them up by making them into deviled chicks. Instead of cutting the hard boiled eggs in half lengthwise, I used my paring knife to cut a zigzag around the center. The egg white part popped right off, and I stuffed them with my traditional deviled egg recipe.

These little chicks were so cute for Easter! But the basic recipe can be used year-round.

While the eggs were super cute this year (especially with my Bunny Butt Cake!), it starts with a good hard boiled egg and a simple, yummy deviled egg recipe. So matter what time of year it is, these helpful tips will be good for any occasion. And honestly, while not all these ingredients are in my Kitchen Staples list, you’ll find all of them in my kitchen year-round because they’re so versatile.

What you’ll need:
1 dozen eggs
6 tablespoons nonfat mayo
1/4 teaspoon Worcestershire sauce (I keep this in my fridge all year, it’s great on steaks or in turkey burgers)
4 tablespoons minced celery (about 3 stalks)
2 tablespoons pickle relish (Clinton loves it on sandwiches)
1/4 teaspoon salt
Dash of hot sauce (tapatio is my favorite, but any kind will do)
Paprika for garnish

What you’ll need to do:

Let’s start by hard boiling your eggs. Put your eggs in a pot large enough so that all of them are spread out in one even layer (your very large pot works perfectly). Fill the pot with cold water from the tap, enough to cover the eggs with at least 1 inch of water. Add a palmful (tablespoon) of salt to prevent the eggs from cracking and making them easier to peel. Bring your water to a boil over high heat.

Watch these guys closely, salted water boils more quickly than unsalted water and you don't want to overcook your eggs.

As soon as the water reaches a boil, turn off the heat and cover your pot. Let your eggs sit in the hot water for about 12-15 minutes. Remove the eggs from the pot with a slotted spoon (be careful, that water is still hot), and put them in a bowl of ice water. Or, to save a dish, drain the water out of the pot and refill with cold water and ice.

After your eggs have cooled, either store them in a covered container in the fridge or peel them for your deviled eggs. Now, peeling hard boiled eggs is probably one of my least favorite things to do because it’s so time-consuming. Make sure you do it while watching a good show on TV or recruit a friend to help you. I always tap the bottom of the egg on the edge of my kitchen counter – if you make a divot in the egg, at least it’s on the bottom. Use your fingernails to start peeling the shell, and then use the edges of your fingers (not nails) to peel the shell off the rest of your egg. If you use your fingernails for the whole egg, you’re more likely to get nicks (I do for sure!).

Once all your eggs are peeled, cut them to get out the yolks and make your shapes. For the deviled chicks, I used my paring knife to make a zigzag cut around the center of the egg. If you’re making regular deviled eggs, cut them lengthwise. As I cut the eggs, I toss the yolks in a bowl where I’ll make the stuffing for the deviled eggs.

This is definitely the most time-consuming part, but making your basic deviled eggs into deviled chicks really didn't make much difference time-wise. Cuteness-wise, deviled chicks definitely take the win.

Finally! We get to make the best part about the deviled eggs: the yummy, tangy, center – and it’s the easiest part! In your bowl with the yolks, add the mayo, Worcestershire sauce, celery, relish, salt, and hot sauce. If you have an electric mixer, go to town until the mixture is totally blended. Good ol’ elbow grease and a fork will work, too.

Stuff your egg halves with the yolk mixture and then sprinkle with paprika. If you’re making the chicks, stuff half of the egg white “shell” with a big spoonful of the mixture and then top with the other half of the egg white “shell.” For the eyes, I used bacon bits. And for the beak, I used a small sliver of carrot. So cute!

It's so easy to pop one of these in your mouth every couple minutes that it's rare to leave a party with leftovers.

It’s hard work, but so worth it. Deviled eggs are super delicious and a great appetizer for any party.

Bunny Butt Cake

Too cute for Easter!

I don’t make special cakes very often. As a matter of fact, I don’t even bake very often. But when I saw this Bunny Butt Cake idea, it was too cute to pass up this Easter. And it’s amazing how easy it was to do! I cheated by using cake mix and a can of frosting so I could let the cuteness do all the talking. Needless to say, it was a smash hit.

Basically, the Bunny Butt Cake is a round cake baked in a bowl, three cupcakes (two feet, one tail), a jumbo marshmallow cut in half to make the heels of the feet, taffy to make the pads of the feet, and coconut to make the fur and grass. Not too crazy, right? Here’s the step-by-step.

What you’ll need:

  • 1 box of cake mix (I used vanilla, but thought carrot or strawberry would be fun)
  • 1 can of frosting (white frosting is best so you can dye it pink, I used vanilla)
  • 1 jumbo marshmallow (for the tops of the bunny heels)
  • 3 cups coconut, or one bag (for the bunny fur and grass)
  • Strawberry taffy (for the pads of the bunny feet)
  • Tools you’ll need:
    • 1 1/2-quart oven-safe bowl (like this one)
    • Cupcake pan
    • Construction paper (for the ears)
    • Food coloring

What you’ll need to do:

Preheat your oven to 325. Grease your 1 1/2-quart bowl and cupcake pans (or use cupcake wrappers in the cupcake pans).

Make your cake batter like normal – to make it easier (and to make less dishes), I just made the batter in the oven-safe bowl. Pour out enough batter to fill three cupcake cups 2/3 full. Bake the cupcakes for 17-21 minutes, and bake the cake for 47-53 minutes. Use the toothpick test to check if they’re done (stick a toothpick in the middle of your cake/cupcakes, if it comes out clean you’re done; if it comes out wet, stick the bowl/pan back in for a couple more minutes and then recheck).

Cool your cake and cupcakes for about 10 minutes in the bowl/pan. Remove the cake by flipping upside down on your serving dish (use a plastic spatula to help get the cake out if need be), and remove the cupcakes from the pan. Cool completely for about 1 hour before frosting.

Here's the start of your bunny. You can see the shape from the bowl here as well as basically how the cupcakes will be positioned.

Spoon frosting into a bowl and use red food coloring to make desired pink color (about 3 drops). Spread 1/3 frosting over the cake, and then adhere the cupcakes to the cake to make the feet and tail. Then, cut your jumbo marshmallow in half and place on top of the two cupcakes to make the heels of the feet. Spread thin layer of frosting over the whole cake (including feet and tail) to seal in the crumbs. Freeze for 30-45 minutes to set the frosting.

This shows how the cupcakes will be adhered to the cake, as well as how the marshmallows will be positioned as the heels. At this point, it's time to frost the whole thing. Before you know it the whole shape will come together.

Spread remaining frosting over cake. Sprinkle with two cups of coconut and press gently to adhere. Shake remaining coconut in a sealed plastic baggie with 3 drops of green food coloring until evenly tinted. Surround bunny with your coconut grass.

Here's the basic bunny frosted! See the picture at the very top for the overall look.

Use your fingers and hands to roll small pieces of taffy into balls, and then press into two large ovals and six small circles for the pads of the feet – you may need frosting to help them adhere to the feet. Cut ears out of construction paper and tuck a small bit under the cake and use a small dab of frosting to help them stand straight up.

And there’s your bunny! Even though Easter has passed this year, your bunny would be perfect for any Spring-themed party, birthday, or great to make next year. Whatever the occasion, he’ll be the hit of a party.

Mom’s Sticky Buns with Butterscotch and Pecans

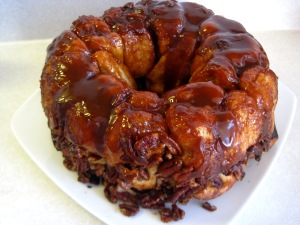
Every year for Easter, my mom makes these sticky buns that my brothers and I look forward to more than any Easter basket or egg hunt. They’re ooey and gooey, dripping with butterscotch and pecans. The rolls themselves are soft and chewy, making every forkful utterly indulgent.

And they’re very easy to make! Aside from being a delicious treat, my mom likes to make this for the holidays because a bulk of the work is done the night before. This way, all she has do to is pop them in the oven in the morning so she can enjoy us kids opening our Easter baskets without laboring in the kitchen.

This is my favorite family recipe of all time, and I look forward to these every year.

What you’ll need:
1 15 ounce pack uncooked frozen dinner rolls (or about 15 rolls), make sure they’re not the already cooked “bake in 6 minutes” kind
1 box butterscotch pudding, not instant (if you can’t find butterscotch, vanilla is also tasty)
1/2 cup brown sugar
1/2 cup butter, melted
2 cups chopped pecans

What you’ll need to do:

Grease a 10-12 cup bundt pan. Arrange balls of dough in pan, evenly spreading them around the pan. Then, sprinkle the pudding mix and then the brown sugar. Pour melted butter over the top of the mixture and then sprinkle with nuts.

It seems like the pan is not filled nearly enough, but these rolls rise and incredible amount by morning.

Lastly, cover it with a towel and let it rise overnight. I generally allow for about 10 hours.

When you wake up in the morning, the dough will be nice and risen.

This is what you'll wake up to in the morning before it's baked. It's amazing how much the dough rises!

Bake at 325 degrees for about 30 minutes.

Flip onto a serving dish and enjoy! My family always eats this as our Easter treat, but it would be great on any other holiday morning.